
3D Printer Parts: Complete List of 3D Printing Components

Ever wondered what's actually humming inside your machine? This breakdown walks through every one of the 3D printer parts that turn plastic into finished models. Dive in.
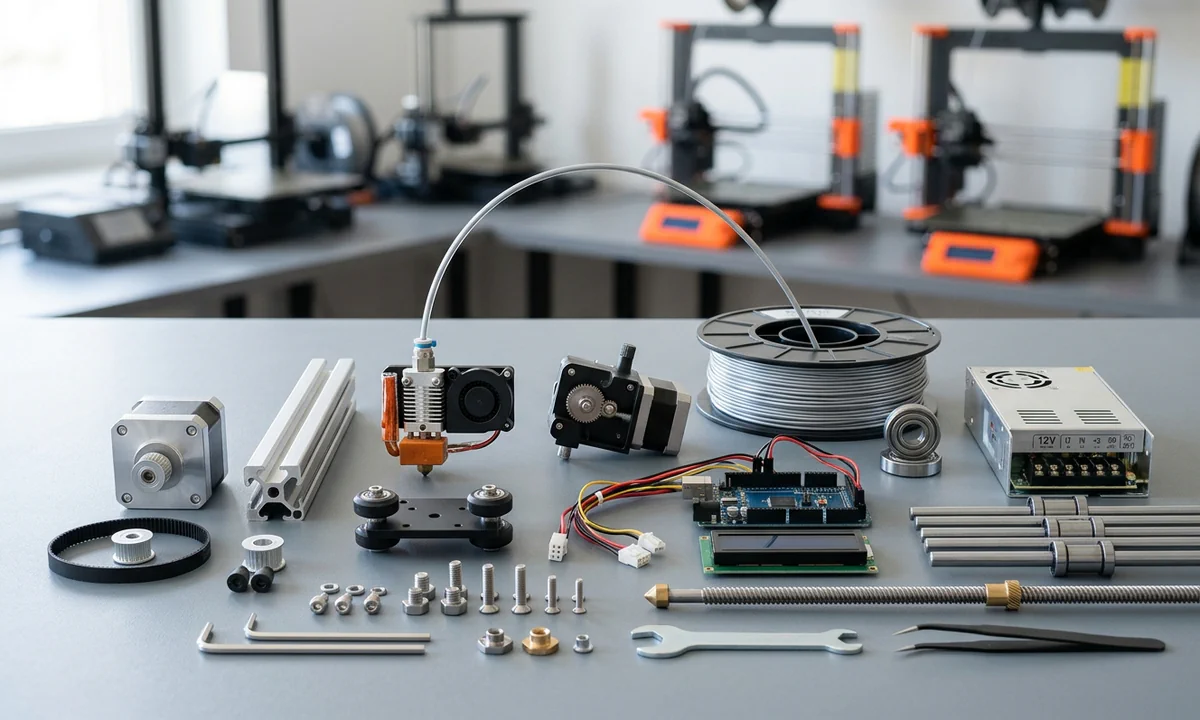
A failed print often starts with a tiny part you can't name. The nozzle clogs, the Extruder slips, or the Thermistor reports the wrong temperature, yet every symptom looks like "the printer stopped working." Learning the names and jobs of the major 3D printer parts changes that. It gives you a shared language for troubleshooting, comparing machines, shopping for upgrades, and understanding advice from experienced makers.
One common myth deserves attention early. Many new owners think the nozzle alone controls print quality. It doesn't. The nozzle works as one link in a longer chain that includes the hot end, extruder, motion system, electronics, and build surface. Another misconception claims every desktop printer uses the same hardware. Resin machines follow an entirely different approach and replace several familiar FDM components with specialized optical parts.
Most hobby printers fall into two families. FDM machines melt thermoplastic filament through a heated nozzle, while resin printers cure liquid resin using ultraviolet light. Despite those differences, both rely on coordinated mechanical structures, accurate motion, stable electronics, temperature control, and carefully calibrated surfaces.
Once you recognize how each component supports the others, strange failures stop looking random. They become clues pointing toward a specific system instead of an entire machine.
3D printer partsThe Skeleton: Frame and Motion
Flex hides in places you rarely notice. A printer frame may look rigid while moving slowly, yet even slight vibration can leave repeating ripples across a finished model. That makes the structural system far more important than many beginners realize. Every successful print begins with a machine that moves predictably.
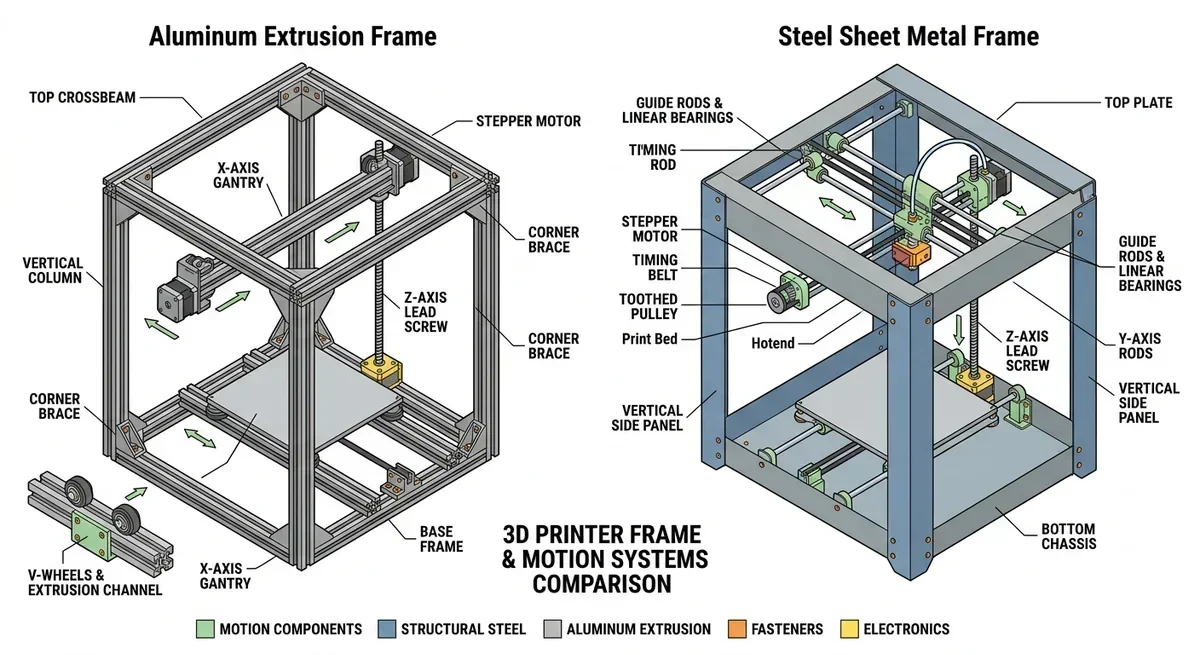
This diagram compares aluminum extrusion and steel sheet metal frames for 3D printers, highlighting key components like stepper motors, lead screws, and gantries. Understanding these structures is crucial for achieving precise and reliable 3D prints.
The frame provides that foundation. Aluminum extrusion dominates consumer printers because it combines reasonable weight with excellent stiffness and accepts accessories easily. Steel frames appear on heavier industrial systems where additional rigidity outweighs portability.
Above the frame sits the gantry, the structure that carries moving assemblies along the X, Y, and Z axes. Together these axes define every point where material will be deposited. Precision depends on more than motors alone. Motion hardware determines whether the toolhead arrives exactly where the firmware expects.
Several components work together:
- Stepper Motor: Converts digital commands into precise rotational movement.
- Belts: Drive fast X and Y motion with low backlash when correctly tensioned.
- Lead Screws: Lift the Z-axis accurately and support heavy gantries.
- Linear Rails: Reduce play while improving repeatability during rapid movement.
- V-Wheels: Roll along aluminum extrusions as an affordable alternative to rails.
Machine design changes how these pieces interact. An Ender-3 relies on V-wheels for economical motion and remains capable of impressive prints after careful adjustment. By comparison, the Neptune 4 Max combines linear rails with dual Z lead screws, reducing gantry twist during taller prints. Community testing consistently reports greater stability during high-speed printing, though setup quality still matters.

After several weeks of comparing prints across entry-level and mid-range machines, one pattern appeared repeatedly. Owners often blamed slicer settings for ringing artifacts when loose belts or worn wheels caused the problem instead. Research from machine tool engineering has long linked structural rigidity with dimensional accuracy, and desktop printers follow the same mechanical principles on a smaller scale.
3D printer partsWhere Filament Becomes a Print
Heat, pressure, and timing meet inside one compact assembly. Every line of plastic starts as solid filament before passing through a carefully controlled sequence of components. If one element drifts outside specification, the entire extrusion process suffers.
The material path looks simple, but each part serves a distinct purpose.
- Extruder: Grips filament and pushes it forward. Direct drive systems mount the motor near the hot end for flexible materials, while Bowden systems place the motor on the frame to reduce moving weight.
- Hot End: Houses the heating system that melts filament before extrusion.
- Heat Break: Separates hot and cool zones, preventing heat from creeping upward and softening filament too early.
- Nozzle: Shapes the final extrusion width. Brass handles common materials well, while hardened steel resists abrasive composites.
- Heater Cartridge: Supplies the thermal energy needed to reach printing temperature.
- Thermistor: Measures temperature continuously so the controller can regulate heat accurately.
- Cooling Fans: One cools the hot end to protect the heat break. Another cools freshly deposited plastic to preserve shape.
Failure patterns usually follow predictable rules. Heat creep often traces back to poor cooling around the heat break. Under-extrusion may result from a partially blocked nozzle, worn extruder gears, or incorrect filament tension rather than insufficient temperature alone. Community discussions across large 3D printing forums repeatedly highlight clogged nozzles as one of the most common maintenance issues for FDM machines.
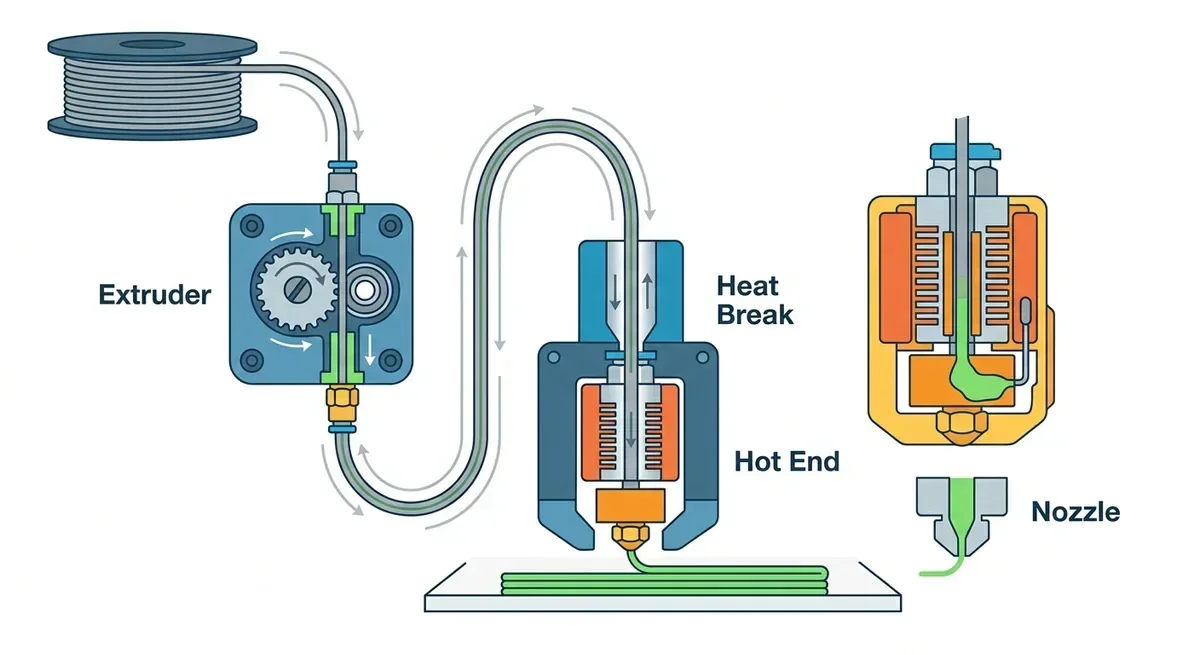
This diagram illustrates key 3D printer components including the extruder, heat break, hot end, and nozzle, essential for understanding filament flow and common maintenance issues.
Nozzle diameter also influences print behavior. A standard 0.4 mm nozzle balances speed and detail for most hobby projects. Switching to a 0.6 mm nozzle can shorten print times substantially, although finer surface detail decreases. Smaller 0.2 mm nozzles capture intricate features but increase print duration and clog more easily. Understanding these trade-offs makes upgrade decisions far less confusing than chasing isolated specifications.
3D printer partsThe Bed Your Prints Rely On
The first layer decides more prints than the last one. You can own a premium extruder and a perfectly tuned hot end, yet a poor first layer often leads to warping, detached corners, or complete failures before the model reaches even a few millimeters in height. The build surface deserves far more attention than its simple appearance suggests.
The Heated Bed raises the temperature beneath the print to slow cooling and reduce internal stress. Different materials benefit by different amounts. PLA often prints well around 50 to 60°C, while PETG and ABS generally require hotter surfaces to maintain adhesion. Material manufacturers publish recommended ranges, but room temperature and airflow still influence the final result.
The Build Plate sits above the heated bed and directly contacts the printed part. Several surfaces dominate today's hobby market.
| Build Surface | Strength | Common Trade-off |
|---|---|---|
| Textured PEI | Excellent adhesion and easy release after cooling | Can leave a textured finish |
| Smooth PEI | Produces glossy bottom layers | Oils from fingerprints reduce grip |
| Glass | Very flat with attractive finishes | Longer heating time and heavier weight |
| Flexible Steel Sheet | Simple part removal by bending | Surface coating eventually wears |
Leveling plays an equally important role. Manual leveling relies on adjustment knobs beneath the bed, requiring you to set a consistent nozzle gap across the surface. Automatic systems measure multiple points with a probe and compensate for small variations through firmware. Auto-leveling doesn't replace proper mechanical adjustment. It simply corrects remaining imperfections.
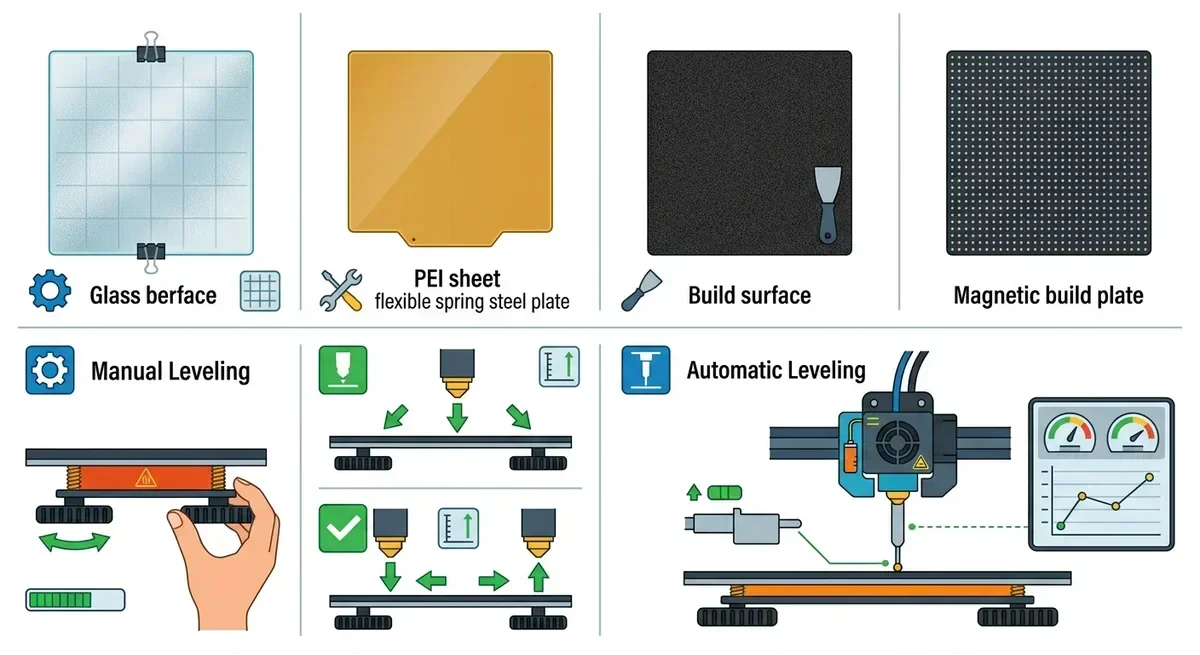
This image details essential 3D printer components, including various build surfaces and leveling methods, highlighting their roles in print quality and ease of use.
After testing several consumer printers over hundreds of printing hours, one observation remained consistent. Printers with a clean PEI sheet and an accurately calibrated first layer produced dramatically fewer failed starts than machines receiving frequent slicer adjustments but inconsistent bed preparation. Community maintenance guides reach the same conclusion: clean surfaces and accurate leveling solve a remarkable number of reliability complaints.
3D printer partsThe Brains: Boards and Electronics
Every movement inside a printer begins as an electrical instruction. Mechanical precision matters, but the machine cannot translate a digital model into coordinated motion without an organized electronic system directing every motor, heater, and sensor.
The Controller Board serves as the central computer. It reads G-code commands, calculates movement paths, regulates temperatures, and synchronizes dozens of actions every second. Modern 32-bit boards process complex calculations much faster than older 8-bit designs, especially during high-speed printing.
Supporting hardware handles specialized tasks:
- Power Supply Unit: Converts household electricity into stable low-voltage power for every component.
- Stepper Drivers: Control each Stepper Motor with precise electrical pulses while reducing vibration and noise.
- Firmware: Software stored on the controller that defines printer behavior, safety limits, and hardware support.
- Display: Allows direct control without connecting a computer.
- Filament Runout Sensor: Detects when filament ends and pauses the print.
- Power Loss Recovery: Saves print position after an unexpected outage on supported machines.
Firmware deserves special attention because it shapes the entire printing experience. Marlin remains the most widely adopted open-source firmware across consumer FDM printers thanks to broad hardware compatibility and years of community development. Klipper takes a different approach by shifting much of the motion planning to an external computer, commonly a Raspberry Pi. That architecture enables advanced motion algorithms and significantly higher print speeds on compatible hardware.
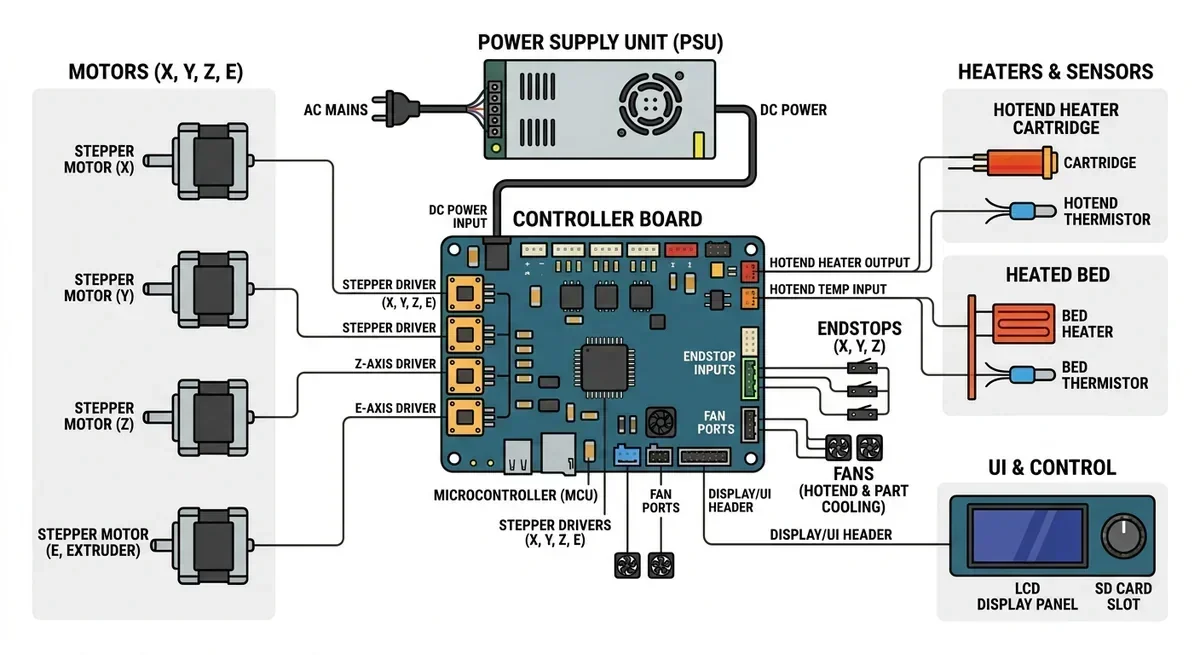
This diagram illustrates the key components of a 3D printer, highlighting the connections between motors, the controller board, power supply unit, heaters, sensors, and user interface controls. Understanding these parts is crucial for optimizing printer performance and maintenance.
Performance gains come with trade-offs. Klipper rewards users willing to configure additional hardware, while Marlin offers a simpler experience for beginners who prioritize stability over experimentation.
Safety depends on these electronics as much as convenience does. Thermal runaway protection constantly checks whether the thermistor reports temperatures that match expected heating behavior. If readings become unsafe, modern firmware shuts the printer down automatically. Safety organizations and printer manufacturers widely consider this feature essential, especially after early consumer machines lacked adequate protection years ago.
3D printer partsResin Printers Use Different Parts
Liquid resin changes the entire machine design. An MSLA printer never pushes filament through an extruder because nothing needs to melt before printing begins. Instead, light hardens selected regions of a liquid photopolymer one layer at a time. That single difference removes several familiar FDM components and introduces an entirely different collection of hardware.
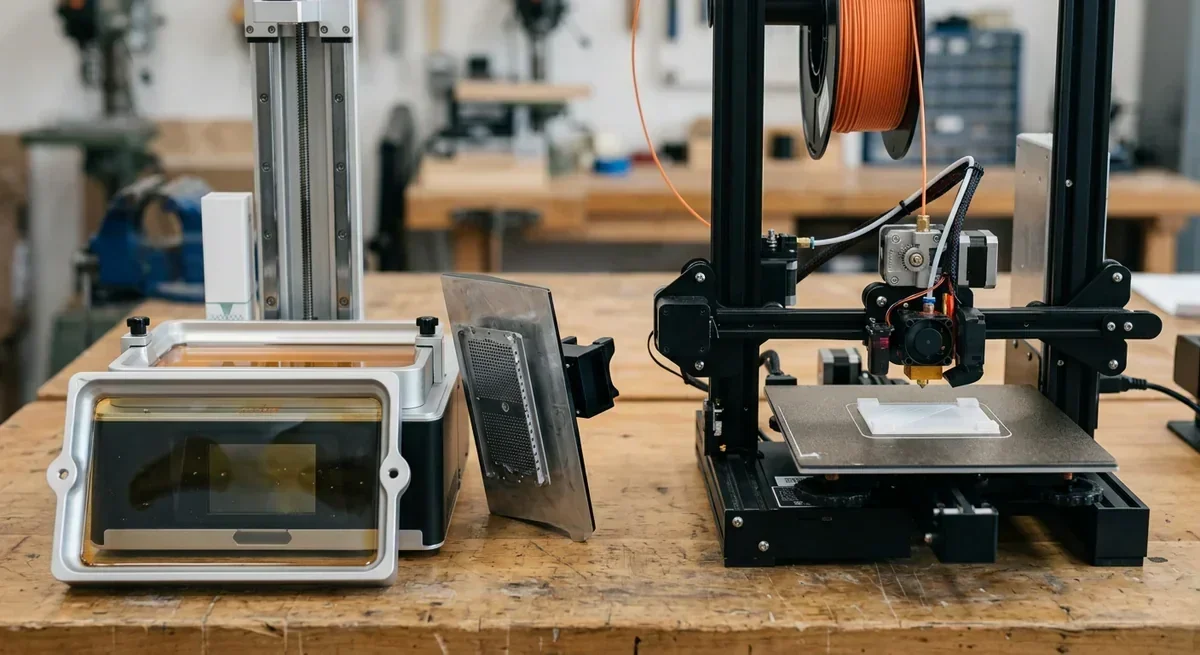
An MSLA resin printer and an FDM 3D printer side by side, highlighting the distinct components used in each technology. This comparison underscores the differences in design and functionality between resin and filament-based 3D printing.
The printing process revolves around a few specialized parts:
- LCD Masking Screen: Acts as a high-resolution stencil by blocking or passing ultraviolet light for each layer.
- LED Array: Provides the ultraviolet light that cures the resin beneath the LCD.
- Resin Vat: Holds the liquid resin during printing.
- FEP Film: Forms the transparent bottom of the vat, allowing UV light to pass while letting cured layers separate cleanly.
- Build Plate: Raises the finished model upward after each completed layer.
- Single Z-axis: Moves the build plate vertically with a lead screw and stepper motor.
The Anycubic Photon Mono M5s Pro illustrates this architecture well. Instead of coordinating multiple moving axes during every layer, it keeps the optical system fixed while only the Z-axis moves. That simpler motion system often produces exceptionally smooth surfaces because each layer forms simultaneously across the entire cross-section rather than through continuous toolhead movement.

Different hardware creates different failure points. A scratched FEP film can reduce print quality or cause adhesion failures. An aging LCD masking screen gradually loses light transmission after extended use, eventually increasing exposure times or reducing detail. Resin contamination also matters far more than filament contamination because uncured particles remain suspended inside the vat.
Industry testing consistently shows that modern monochrome LCD screens last several times longer than older RGB displays, although lifespan varies with exposure intensity and printing frequency. Experienced resin users also agree on one maintenance habit above all others: filter resin before returning it to the bottle. Tiny cured fragments can damage future prints even when every mechanical component functions perfectly.
3D printer partsKey Takeaways
- Every successful print depends on multiple systems working together, not a single component.
- Mechanical rigidity affects print quality just as much as slicer settings and temperature.
- The extrusion chain includes the extruder, hot end, heat break, nozzle, heater cartridge, thermistor, and cooling fans, each with a distinct job.
- Heated beds and properly leveled build plates dramatically improve first-layer reliability.
- Controller boards, firmware, and sensors coordinate movement, heating, and safety throughout every print.
- Resin printers replace the extrusion system with optical components such as an LCD masking screen, LED array, and resin vat.
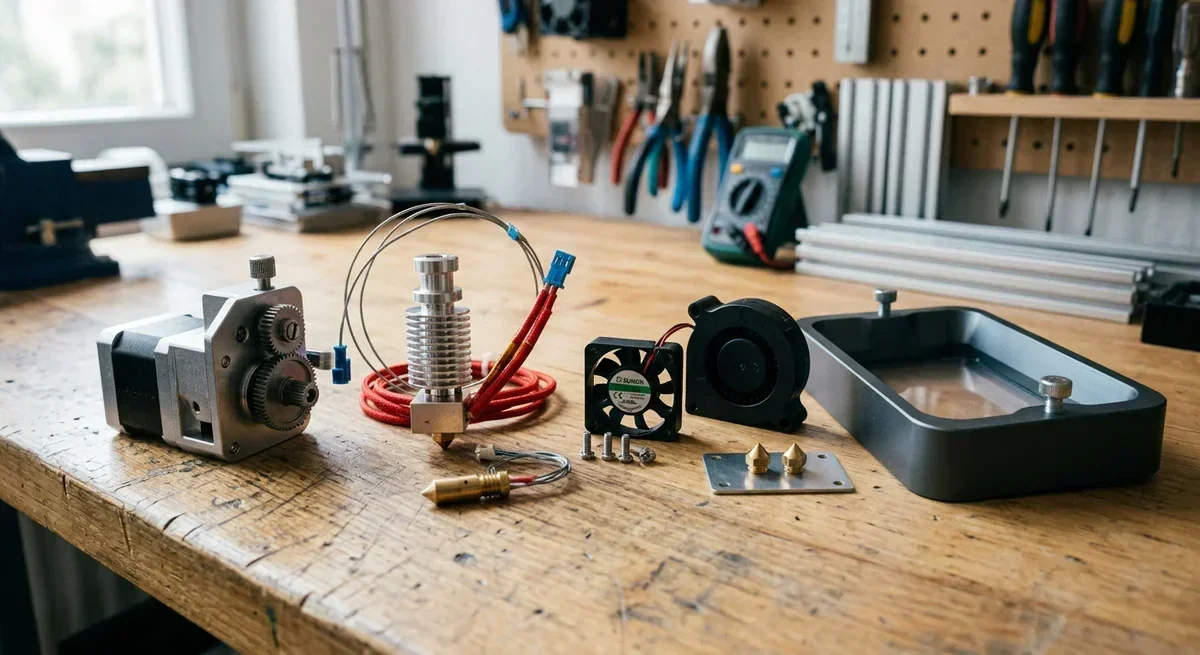
A selection of essential 3D printer components such as an extruder, hotend, fan, and resin vat, crucial for precision printing.
3D printer partsHow the Parts Add Up
Learning the names of 3D printer parts does more than expand your vocabulary. It changes how you think about every print. Instead of treating failures as mysterious events, you begin tracing symptoms through connected systems. A nozzle clog might originate in poor cooling around the heat break. Ringing on a finished model may point toward loose belts rather than incorrect slicer settings. A lifting corner often starts with bed preparation instead of extrusion.
That systems perspective also makes buying decisions easier. Marketing highlights individual upgrades because they attract attention, yet printers succeed through balance. A powerful controller cannot compensate for a flexible frame, and premium linear rails cannot overcome poor temperature control. Reliable machines combine mechanical stability, accurate electronics, controlled heating, and appropriate materials into one coordinated platform.
As your experience grows, every new component becomes less intimidating. Community discussions become easier to follow, maintenance guides become more meaningful, and upgrade recommendations make practical sense instead of sounding like unfamiliar jargon. The next time a print fails, start by asking which system produced the symptom. That simple habit often leads you to the real cause much faster than replacing parts at random.
Technical communicator specialising in 3D printing workflows, covering the full content spectrum: foundational guides, step-by-step how-to tutorials, hands-on reviews, curated top picks, troubleshooting solutions, and industry news.
Free Downloads
Loading...

3D Printer Maintenance Schedule Template
Customizable maintenance schedule template to keep your 3D printer in perfect condition and extend its lifespan.
3D Printer Components Checklist
Complete printable checklist of essential 3D printer parts and components for maintenance and upgrades.