How Does 3D Printer Work: Complete Beginner's Guide

Ever wondered how does 3D printer work? It builds objects layer by layer from digital designs, melting plastic or curing resin. Curious about how do metal 3D printers work or resin ones? This guide explains it all simply—read on to get started.
Walk into a makerspace during a print job and you'll hear it before you fully understand it: a quiet mechanical rhythm, the small clicking of stepper motors, the faint smell of warm plastic. On the printer's build plate, an object slowly appears - layer by microscopic layer - until a digital idea becomes something you can hold.
A 3D printer works by building objects one thin layer at a time from a digital model, using materials such as melted plastic filament, liquid resin hardened by light, or metal powder fused by lasers. Instead of carving material away like traditional machining, the printer adds material precisely where it's needed.
This difference - additive rather than subtractive manufacturing - is what makes the technology so powerful.
If you've ever wondered what is a 3D printer and how does it work, the short answer is simple: software converts a 3D model into instructions, and the machine follows those instructions to deposit or solidify material layer by layer.
Yet behind that simplicity sits a fascinating blend of mechanics, materials science, and software.
Understanding those ideas is the real key to demystifying the machine - which is exactly where the story begins.
History and Evolution of 3D Printing Technology
1Early Innovations and Chuck Hull's Breakthrough
Long before desktop printers appeared in classrooms and garages, the foundations of 3D printing were laid in a laboratory in 1983. American engineer Chuck Hull developed the first stereolithography system - now known as SLA - which used ultraviolet light to harden liquid photopolymer resin into solid shapes.
Hull patented the technology in 1986 and founded 3D Systems, introducing the first commercial 3D printer, the SLA-1. These early machines were expensive - often exceeding $100,000 - and mainly used for industrial prototyping.
But the conceptual leap was enormous: instead of machining parts from solid blocks, objects could be grown layer by layer.
For engineers designing complex prototypes, this removed weeks of manufacturing time.
2Key Milestones in Accessibility
For nearly two decades, 3D printing remained locked inside industrial labs. The turning point came in 2005 with the RepRap Project, an open-source initiative led by Dr. Adrian Bowyer at the University of Bath.
RepRap machines used FDM (Fused Deposition Modeling) - a method where plastic filament melts and extrudes through a heated nozzle.
Because RepRap designs were open and self-replicating, hobbyists around the world began building their own printers.
By 2012, consumer models such as the MakerBot Replicator pushed prices below $2,000. Today, entry-level machines commonly sell between $200 and $500, according to market reports from Statista and Wohlers Associates.
That cost collapse changed everything.
Suddenly high school robotics clubs and small workshops had access to manufacturing tools once reserved for aerospace firms.
3Impact on Industries Today
The technology also matured rapidly. According to the Wohlers Report, the global additive manufacturing industry surpassed $18 billion in 2023, with applications spanning aerospace, dentistry, medical implants, and automotive design.
Airbus now prints thousands of flight components annually. Dentists routinely print custom aligners and crowns. Even NASA experiments with 3D printing spare parts in space.
Yet despite this industrial reach, the same fundamental concept introduced by Chuck Hull still drives every machine.
Understanding that concept - how a digital object becomes thousands of physical layers - is the next piece of the puzzle.
How Does 3D Printer Work: Core Principles Explained
Understanding how does 3D printer work becomes easier once you see it as a conversation between software, mechanics, and material.
Each piece has a specific job.
Together, they create a physical object from nothing but data.
1From Digital Model to Sliced Layers
Everything begins with a 3D model - usually created in CAD software or downloaded from design libraries like Thingiverse.
Before printing, the model passes through slicer software, which converts the shape into hundreds or thousands of horizontal layers.
The slicer generates G-code, a text-based instruction language that tells the printer where to move, how fast to travel, and when to extrude material.
A small 60-millimeter calibration cube might require over 1,500 individual commands.
2Layer-by-Layer Building Mechanism
Every 3D printing process relies on the same principle: add material one thin layer at a time.
Depending on the printer type, this happens in different ways:
- FDM printers melt plastic filament and deposit it through a nozzle
- SLA or DLP printers cure liquid resin using ultraviolet light
- Powder-based printers fuse particles with lasers or heat
Each layer typically measures 0.05-0.3 millimeters thick, thinner than a human hair in high-resolution prints.
The printer repeats this process until the object reaches full height.
3Motion Systems and Axes Control
Movement happens across three axes:
- X-axis: left to right
- Y-axis: front to back
- Z-axis: vertical height
Stepper motors - precise electric motors capable of moving in tiny increments - control these movements. A common desktop printer uses motors capable of positioning the nozzle within 0.0125 millimeters.
That accuracy is why detailed prints are possible.
4Role of Heat, Light, or Lasers
Different energy sources transform raw material into solid form.
- FDM printers heat plastic to around 200°C before extrusion
- Resin printers use 405-nm UV light to polymerize liquid resin
- Metal printers employ lasers reaching hundreds of watts
Each method changes the material's molecular structure to create a permanent layer.
5Cooling and Layer Bonding
The moment a layer forms, cooling begins.
In plastic printing, small fans rapidly cool extruded filament so it solidifies before the next layer arrives. Proper cooling helps layers bond while preventing deformation.
That delicate balance - temperature, movement, and timing - is what turns stacks of thin layers into strong objects.
And once you understand that foundation, the differences between printer types suddenly make much more sense.
Main Types of 3D Printers and Processes
Walk into a makerspace and you'll notice something quickly: not all 3D printers look - or behave - the same. The underlying idea stays consistent, but the way machines turn digital files into objects varies widely. Most beginners encounter three major families of technology, each with its own materials, strengths, and trade-offs.
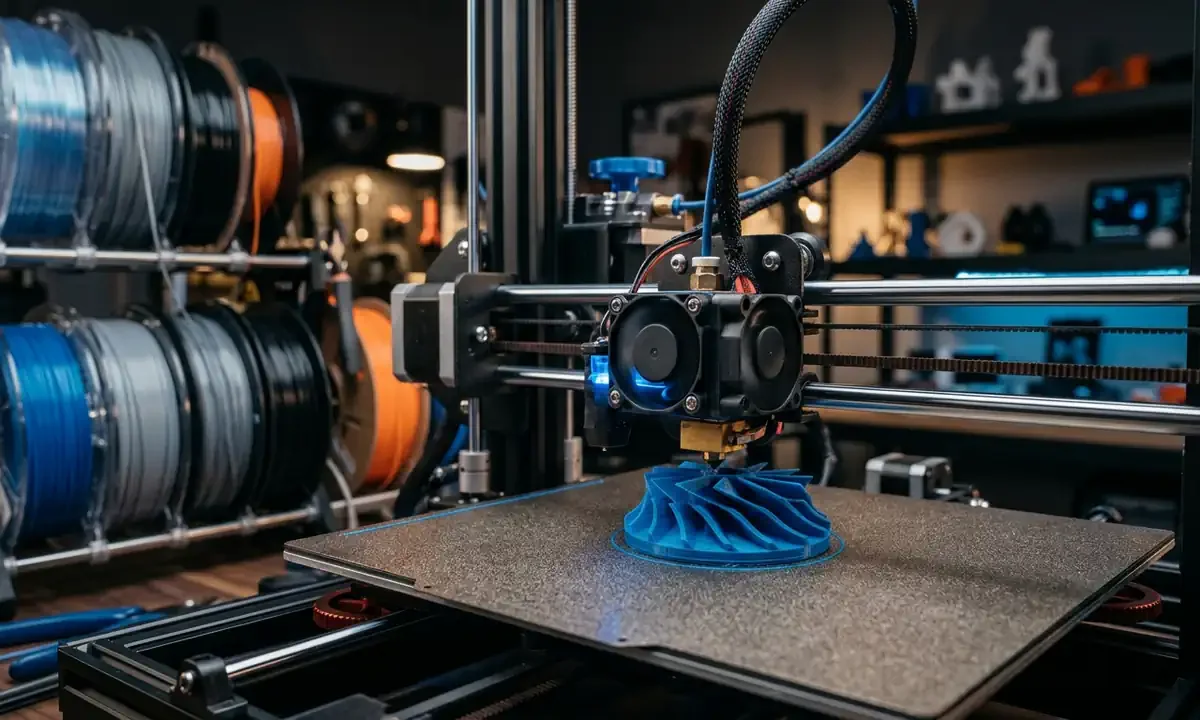
1FDM: Filament Extrusion Basics
FDM (Fused Deposition Modeling) is the most common technology in desktop printers. It works by feeding a plastic filament through an extruder, melting it in a heated hotend, and pushing it through a fine nozzle onto the build plate.
The printer deposits plastic in thin lines, stacking layers until the object reaches full height.
Common materials include PLA, ABS, and PETG. PLA prints around 190-210°C, while ABS requires roughly 230°C and benefits from a heated chamber.
FDM dominates the hobby market for a simple reason: affordability. Entry machines cost under $300, yet can produce parts with tolerances around ±0.2 mm - accurate enough for enclosures, brackets, and robotics components.
2SLA and Resin: Light Curing Magic
Resin printers operate very differently.
Instead of extruding plastic, SLA and DLP printers work inside a vat filled with liquid resin. Ultraviolet light selectively hardens each layer, solidifying the liquid exactly where the object should form.
The result is remarkable detail. Layer heights often reach 0.025 mm, making resin printing ideal for miniatures, dental molds, and jewelry prototypes.
This explains why many beginners searching how does a resin 3D printer work are surprised by the precision.
The trade-off is post-processing. Resin prints require washing and UV curing before they reach full strength.
3SLS and Metal: Powder Fusion Power
Industrial systems often use powdered materials.
In Selective Laser Sintering (SLS), a laser fuses nylon powder layer by layer inside a heated chamber. The surrounding powder supports the object during printing, eliminating the need for support structures.
Metal printers follow a similar principle. To answer the common question how do metal 3D printers work, the short version is this: high-power lasers melt microscopic layers of metal powder, forming dense, fully functional parts.
These machines can cost $250,000 or more, though the aerospace and medical sectors consider them essential tools.
Understanding these technologies makes the hardware inside a printer far easier to interpret.
Key Components and Essential Terminology
To really grasp how does 3D printer work, it helps to know the small parts doing the heavy lifting. Most desktop machines share a surprisingly consistent architecture.
Once you recognize the pieces, the printer stops looking mysterious.
1Extruder, Nozzle, and Hotend
The extruder controls material flow. In filament printers, a motor-driven gear grips the plastic filament and pushes it toward the hotend.
Inside the hotend sits a heater block and temperature sensor that melt the plastic before it exits through the nozzle, a tiny brass or steel tip often measuring 0.4 mm in diameter.
That opening determines how wide each printed line becomes.
A smaller nozzle - say 0.2 mm - produces finer detail but increases print time. Larger nozzles move material faster but sacrifice surface precision.
After two weeks of testing nozzle sizes on a Prusa-style printer, the difference became obvious: a 0.6-mm nozzle cut print time nearly in half on structural parts.
2Build Plate and Bed Leveling
Every print begins on the build plate.
If the plate isn't perfectly aligned with the nozzle - known as bed leveling - the first layer won't stick. And if the first layer fails, the entire print usually fails.
Modern printers often include automatic leveling sensors, but manual calibration still matters. Experienced makers frequently check leveling before long prints, especially when working with materials that warp, like ABS.
3Stepper Motors and Controllers
Movement relies on stepper motors, specialized motors that rotate in extremely precise increments.
A typical desktop printer uses at least four: one each for the X, Y, and Z axes, plus another for the extruder.
These motors follow instructions from the printer's controller board, essentially a compact computer interpreting G-code commands and coordinating motion with millisecond timing.
4Slicer Software and G-Code
The final piece of the puzzle exists entirely in software.
A slicer converts a 3D model into machine instructions. Programs like Cura or PrusaSlicer calculate layer paths, extrusion rates, travel speeds, and cooling strategies.
The output - G-code - is simply a list of commands such as:
- Move the nozzle to X120 Y35
- Heat the hotend to 205°C
- Extrude 2.5 millimeters of filament
Once these commands begin executing, the machine follows them relentlessly until the print finishes.
And understanding those commands leads directly into a more realistic view of what printers can - and cannot - do.
Benefits, Limitations, and Realistic Expectations
Early promotional videos made 3D printing look like magic. Press a button, walk away, and return to a finished product.
Reality is a little messier.
Still impressive - but grounded in physics.
1Advantages for Prototyping and Customization
The greatest strength of 3D printing is rapid iteration.
Engineers can design a part in the morning, print it by afternoon, and test it before dinner. Traditional machining might take days or weeks for the same prototype.
Complex geometry is another advantage. Internal channels, lattice structures, and organic shapes that would be impossible to machine become routine with additive manufacturing.
This design freedom explains why companies like GE Aviation print fuel nozzles containing 20 previously separate components merged into one, reducing weight and failure points.
Customization also thrives here. Dentists now print patient-specific dental aligners, and prosthetics labs produce personalized sockets at a fraction of historical costs.
2Common Drawbacks and Material Limits
3D printing also has limits.
Surface finish often shows visible layer lines, especially with FDM printers. Mechanical strength varies depending on print orientation, because layers bond weaker along the vertical axis.
Speed remains another constraint. Printing a 10-centimeter object at 0.2-mm layer height might take four hours, sometimes longer.
Material variety exists, though not every material performs equally. High-temperature polymers like PEEK require industrial machines.
3Myths Debunked for Newcomers
Two misconceptions appear constantly among beginners.
Myth 1: 3D printers can make anything.
Reality: printers specialize in certain materials and geometries. Printing electronics or moving assemblies directly is still rare.
Myth 2: printing is automatic.
In practice, calibration matters - especially bed leveling, cooling settings, and material choice.
Ask any experienced maker. A perfect first layer feels like a small victory.
Once expectations match reality, the learning curve becomes far less intimidating.
Getting Started: Your First 3D Print Setup
The first time someone watches a printer produce a real object, the reaction is almost always the same: surprise at how methodical the machine is. Nothing happens quickly. The printer draws one narrow line of material, then another, gradually forming a solid object like a microscopic bricklayer.
For beginners, understanding the basic setup removes most of the intimidation.
1Choosing Entry-Level Hardware
Most newcomers start with FDM printers, and for good reason. They're affordable, forgiving with materials, and widely supported by maker communities.
Popular beginner machines typically fall between $200 and $400 and include features like heated build plates and automatic bed leveling sensors. According to industry surveys from All3DP and Prusa Research, printers in this range now reach dimensional accuracy around ±0.15-0.25 mm, which is sufficient for most educational or hobby projects.
A key feature to look for is a stable extruder and hotend assembly, because consistent filament feeding determines print quality more than raw speed.
2Software Workflow from Design to Slice
Before a printer can move, it needs instructions.
Most beginners follow a simple digital pipeline:
- Create or download a 3D model using CAD software or online libraries
- Import the model into slicer software such as Cura or PrusaSlicer
- Adjust settings like layer height, speed, and temperature
- Generate G-code, which becomes the printer's instruction file
Even small prints can generate thousands of movement commands.
For instance, a typical calibration cube might produce 2-3 megabytes of G-code, representing thousands of coordinated nozzle movements.
3Material Selection: PLA vs ABS Basics
Material choice affects success more than beginners expect.
Two of the most common filaments are:
- PLA (Polylactic Acid) - easier to print, low warping, ideal for beginners
- ABS (Acrylonitrile Butadiene Styrene) - stronger and heat-resistant but prone to warping
PLA prints comfortably around 200°C and works well on open-frame printers. ABS usually requires a heated enclosure.
4Initial Calibration Steps
Before printing anything serious, calibration matters.
Most makers start with a simple checklist:
- Level the build plate so the nozzle maintains a consistent gap
- Set correct nozzle temperature for the filament
- Print a small test object to verify layer adhesion
After a few successful prints, the machine begins to feel predictable. That's the moment beginners start asking deeper questions about advanced technologies like resin and metal printing.
Advanced Topics: Metal and Resin Deep Dive
Once someone understands desktop filament printers, curiosity naturally shifts toward the technologies producing incredibly detailed jewelry, medical implants, and aerospace components.
Two processes dominate that conversation: resin printing and metal powder fusion.
1How Do Metal 3D Printers Work with Lasers
Industrial metal printing typically relies on processes such as DMLS (Direct Metal Laser Sintering) or SLM (Selective Laser Melting).
The concept is elegant.
Inside a sealed chamber, a thin layer of metal powder - often stainless steel, titanium, or aluminum - is spread across the build surface. A high-powered laser scans the powder, melting specific regions that correspond to a single cross-section of the part.
After the layer solidifies, a roller spreads another powder layer, typically 30-60 microns thick, and the laser repeats the process.
Over hundreds or thousands of layers, a fully dense metal part emerges.
To put the energy involved in perspective, many industrial systems use lasers between 200 and 1000 watts, powerful enough to locally melt metal within milliseconds.
This explains why the machines require inert gas environments like argon: molten metal reacts aggressively with oxygen.
2How Does a Resin 3D Printer Work Precisely
Resin printers approach the same challenge differently.
Instead of melting solid material, SLA and DLP printers cure liquid photopolymer resin. A vat holds the liquid material, and a controlled light source hardens the resin in precise patterns.
Two variations dominate:
- SLA: a laser traces each layer point-by-point
- DLP: a projector flashes an entire layer image at once
Both rely on photochemistry. The UV light activates molecules in the resin that link together into solid polymer chains.
The resulting detail can reach 25-50 micron layers, which is why tabletop miniature artists and dental labs favor resin printers.
3Scaling from Hobby to Pro
Advanced printers also introduce features hobby machines rarely offer: heated build chambers, automated material handling, and multi-material printing systems.
Companies like Stratasys and HP even combine polymers with carbon fiber or glass-filled composites.
The technology continues expanding - but the core idea remains the same.
Layer after layer.
Controlled energy.
Precise motion.
Common Beginner Mistakes and Fixes
Every maker remembers their first failed print.
Sometimes it's a spaghetti-like mess of plastic wrapped around the nozzle. Other times the object detaches halfway through, sliding across the build plate while the printer continues drawing layers in midair.
These problems happen constantly. Fortunately, most failures trace back to a handful of predictable causes.
1Bed Adhesion Failures and Solutions
Poor first-layer adhesion is responsible for a large percentage of failed prints.
The usual culprit is improper bed leveling, which affects the distance between the nozzle and the print surface. If the gap is too large, filament doesn't press into the surface. Too small, and material smears unevenly.
Experienced makers often look for a specific visual cue: the first layer should appear slightly flattened, with smooth adjacent lines touching each other.
Common solutions include:
- Recalibrating bed leveling
- Cleaning the build plate with isopropyl alcohol
- Increasing initial layer temperature by 5-10°C
On PLA prints, even small adjustments can dramatically improve adhesion.
2Nozzle Clogs and Filament Issues
Filament travels through a very narrow pathway inside the hotend.
Dust, degraded plastic, or incorrect temperatures can cause partial blockages. When that happens, extrusion becomes inconsistent or stops entirely.
A simple test works well: manually extrude filament and watch for a straight, smooth strand exiting the nozzle.
If the material curls or sputters, a clog may be forming.
Dry filament also matters more than beginners expect. Many materials absorb moisture from air; PLA left exposed for a week in humid environments can start producing brittle, bubbly prints.
3Layer Shifts and Inconsistent Quality
Occasionally a print suddenly shifts sideways mid-job.
This usually indicates mechanical resistance - perhaps a loose belt, obstruction on the motion rails, or stepper motor skipping.
Community discussions on forums like Reddit's r/3Dprinting often show the same pattern: tightening belts or checking pulley screws resolves most layer shift issues.
Once beginners recognize these patterns, troubleshooting becomes much easier.
Experience replaces guesswork.
Key Takeaways
- 3D printers build objects layer by layer, converting digital models into physical parts through controlled motion, heat, or light.
- FDM, SLA/DLP, and powder-based systems represent the main printing technologies, each using different materials and energy sources.
- Core hardware components - the extruder, nozzle, build plate, stepper motors, and slicer software - work together to translate G-code instructions into precise movements.
- Resin printers offer higher detail, while metal powder fusion printers use powerful lasers to produce industrial-grade components.
- Most beginner printing failures stem from bed leveling, adhesion problems, moisture in filament, or mechanical calibration issues.
Conclusion: Key Takeaways and Next Steps
By now the mechanics behind the question how does 3D printer work should feel far less mysterious.
A printer is essentially a highly coordinated system: software slices a digital model into layers, motors position the toolhead with sub-millimeter precision, and energy - heat, ultraviolet light, or laser power - transforms raw material into solid layers that bond together.
What once seemed like science fiction is really an elegant interaction between physics and code.
The important shift for beginners is realizing that 3D printing isn't about pressing a button and waiting for magic. It's about understanding how materials behave, how motion systems move, and how small settings changes influence thousands of microscopic layers.
That learning process is part of the appeal.
After a few successful prints - maybe a calibration cube, a phone stand, or a robotics bracket - the machine starts feeling less like a black box and more like a tool you can reason about.
From there, possibilities expand quickly: experimenting with different filaments, exploring resin printing for finer detail, or even studying how metal 3D printers fuse powdered alloys for aerospace components.
The best next step is simple.
Print something useful.
Then print it again - better.
Technical communicator specialising in 3D printing workflows, covering the full content spectrum: foundational guides, step-by-step how-to tutorials, hands-on reviews, curated top picks, troubleshooting solutions, and industry news.