What is 3D Printing? A Quick Guide for Beginners

Curious about What is 3D Printing and why everyone's talking about it? This beginner-friendly 3D Printing Explained guide breaks it down simply. Dive in and start learning today.
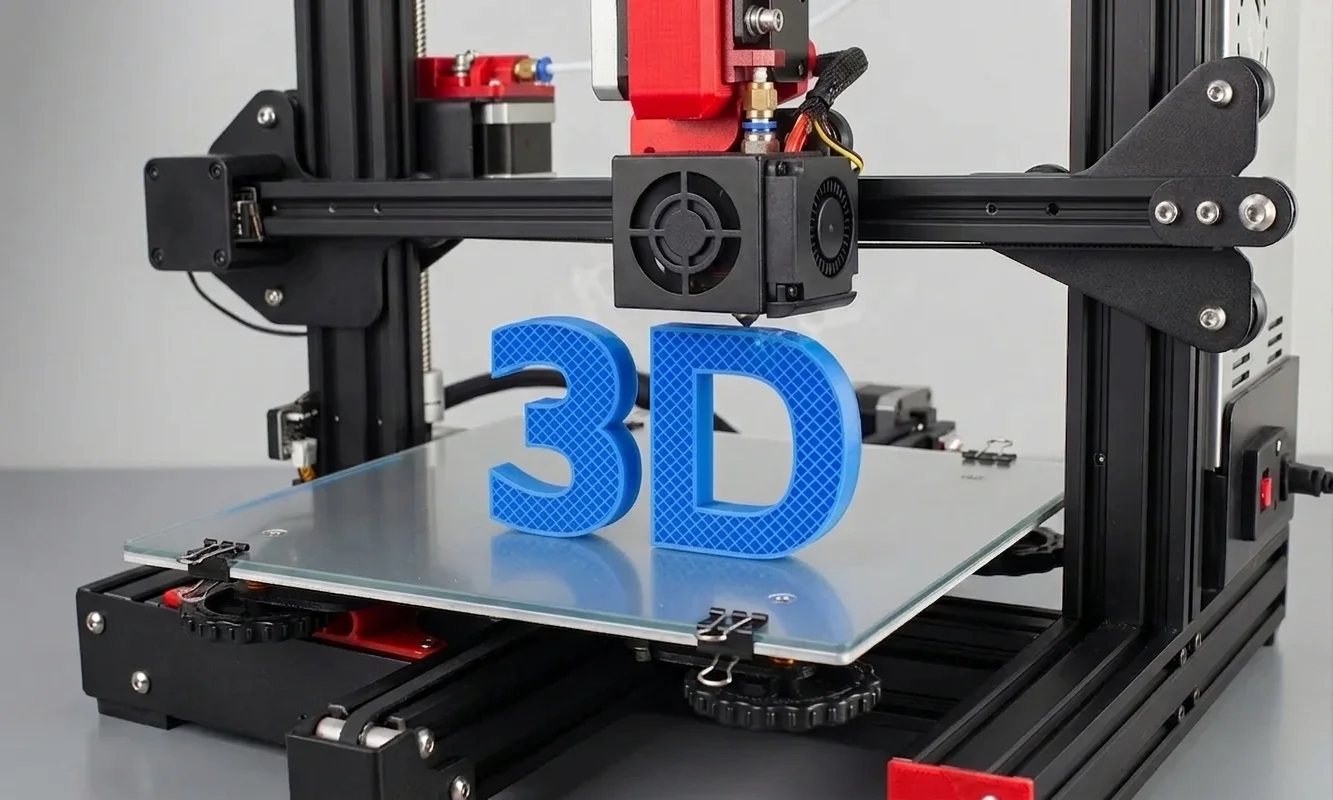
You might remember the first time you watched a 3D printer work. That rhythmic hum, a nozzle gliding back and forth, laying down molten plastic like an invisible hand sketching in midair. It's mesmerizing - almost hypnotic - until you realize something profound: you're watching an idea become real.
That's the essence of 3D printing.
Not a gadget. Not a toy.
A translation machine - turning imagination into something you can hold.
Today, 3D printing quietly powers prosthetics in hospitals, prototypes in garages, and rocket parts at SpaceX. Yet for beginners, the jargon can sound alien: FDM, PLA, resin, slicer, STL, post-processing. If those terms blur together, this guide is your clarity.
Let's decode the world of 3D printing - not through marketing fluff, but through the lens of real makers who've burned their fingertips, scraped failed prints off build plates, and learned why precision often depends more on patience than price.
 Credit (c) Prusa
A prosthetic arm, potentially created using 3D printing, demonstrates practical applications in enhancing daily activities.
Why 3D Printing Matters
Before diving into the "how," let's understand why 3D printing exists at all.
For most of industrial history, making something meant removing material - carving, cutting, drilling, machining. You started with a solid block and chipped away until you had your part. Waste was inevitable.
3D printing flips that logic.
Instead of subtracting, it adds.
Layer by layer, it builds from nothing - no molds, no milling, no massive tooling costs. This shift from subtractive to additive manufacturing changed how we design and prototype. Suddenly, one-off parts, impossible geometries, and personal customization became affordable realities.
What makes 3D printing revolutionary isn't just what it builds - it's what it democratizes. The tools of production are no longer locked in factories. They're on your desk.
A student can print a phone stand between classes.
A researcher can print a prototype before lunch.
A parent can fix a broken toy before dinner.
That's power, quietly humming in the corner of a room.
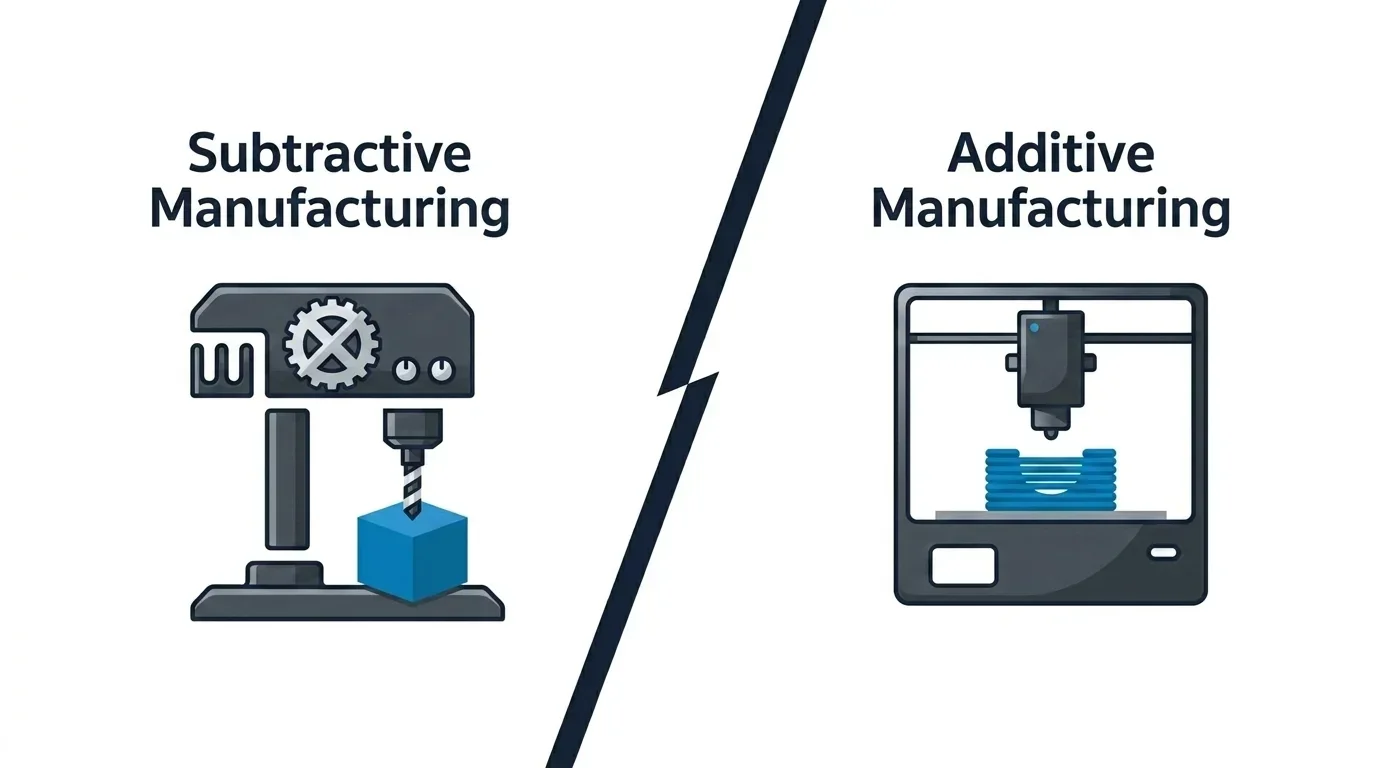
This image contrasts traditional subtractive manufacturing with the revolutionary additive approach of 3D printing, highlighting its accessibility and versatility for everyday users.
The Core Concept: Layer by Layer
At its heart, 3D printing is about layers. A printer reads a digital design file - usually an STL (stereolithography) - and slices it into thousands of cross-sections. Each layer is printed one at a time, gradually forming the full object.
The layers can be as thin as 0.05 mm (about the width of a human hair). Depending on the printer, they're formed by melting, curing, or binding material - usually plastic, resin, or powder. Think of it like building a loaf of bread, slice by slice, except each slice is fused perfectly to the next.
The digital design itself is typically created in a 3D modeling program such as Fusion 360, Blender, or Tinkercad, then exported as an STL. That file doesn't hold color or texture - just geometry. It tells the printer, "This is the shape you need to make."
From there, software called a slicer converts the model into instructions (called G-code) - defining how fast to move, how much material to extrude, and what temperature to maintain. This is where art meets math. Tiny changes here can make or break a print.
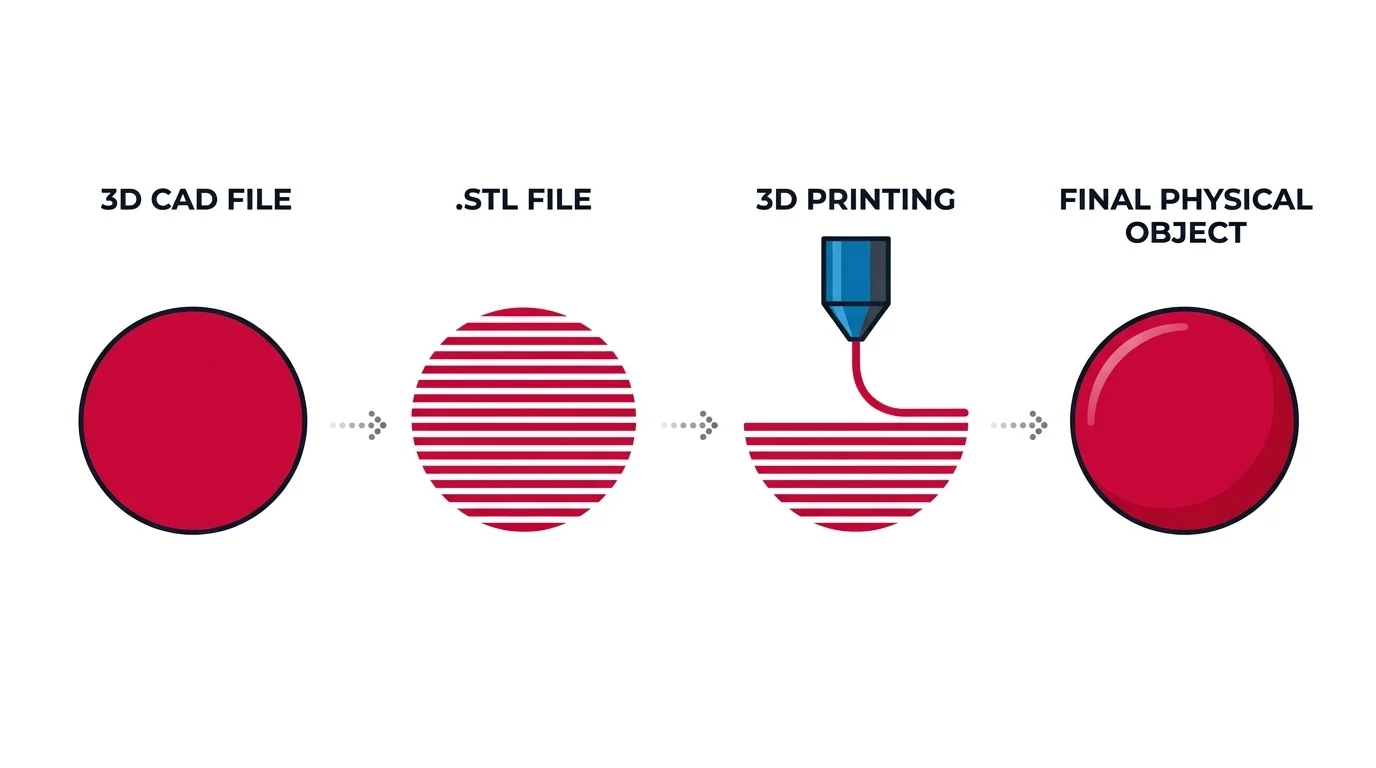
This diagram illustrates the 3D printing process, from creating a CAD design to producing the final physical object. It highlights the conversion of a 3D model into an STL file and the role of slicing in generating G-code for the printer.
How 3D Printers Actually Work
Imagine a robotic pastry chef with unshakable patience.
- The design is loaded.
You take your STL file and open it in your slicer (Cura, PrusaSlicer, or Bambu Studio are popular). You choose your settings - layer height, infill density, support structures - and export the G-code. - The machine heats up.
Depending on the type, it either heats a filament (like a glue gun), a vat of resin (like jelly solidifying under light), or a bed of powder. - Printing begins.
The printer builds your part layer by layer. Each line of code corresponds to a precise motion and material deposition. - Cooling and solidifying.
Fans or UV light harden the material as it forms, ensuring each layer supports the next. - Post-processing.
Once done, most prints require cleanup - removing supports, sanding, painting, or curing under UV. This step is the difference between "homemade prototype" and "polished product."
That's the skeleton of 3D printing, but the magic lies in how many different ways it can be done.
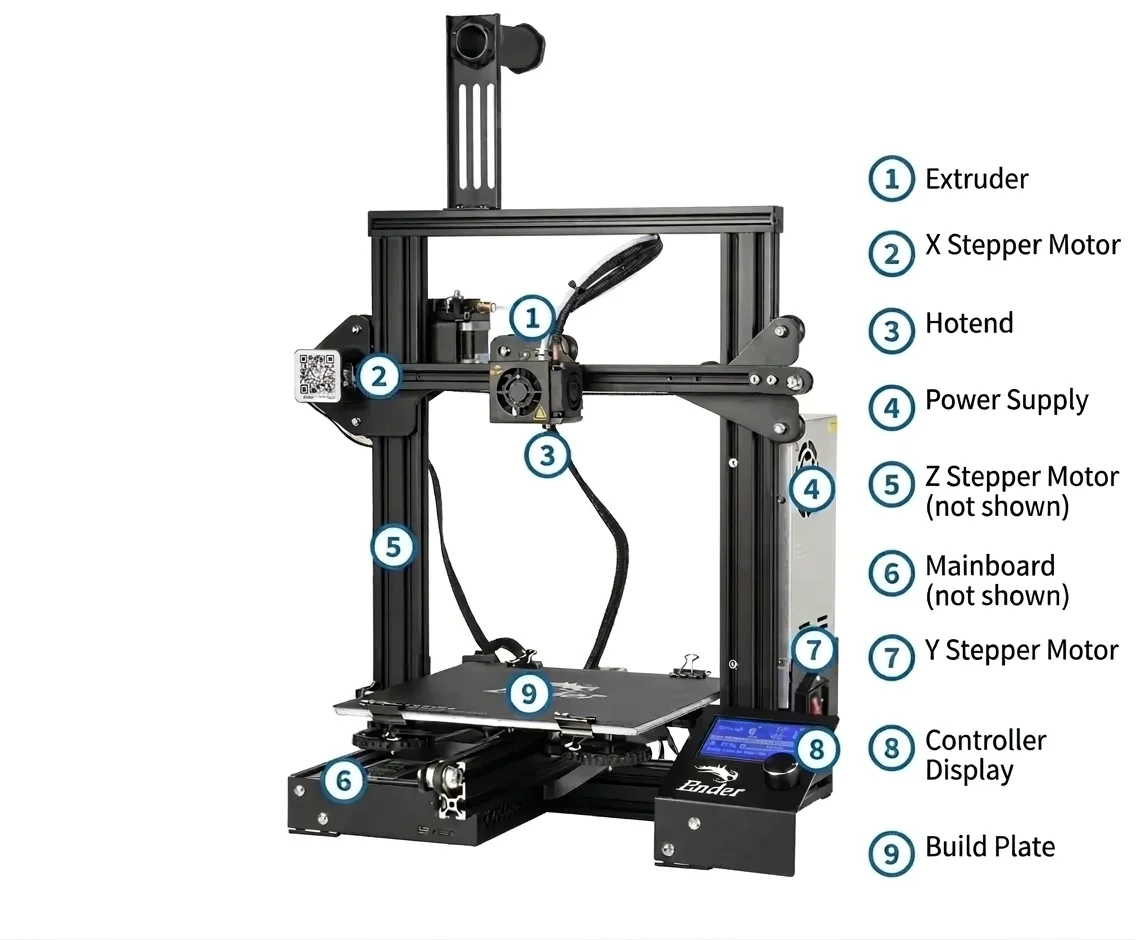
This annotated 3D printer highlights key components like the extruder and build plate, essential for understanding cooling and post-processing in 3D printing.
The Main Types of 3D Printing Explained
There are dozens of 3D printing technologies, but beginners only need to know the main families - each with its quirks, materials, and learning curve.
1FDM (Fused Deposition Modeling)
The workhorse of hobbyist 3D printing.
How it works:
A spool of plastic filament (often PLA, PETG, or ABS) feeds into a heated nozzle that melts and extrudes it onto a build plate, layer by layer.
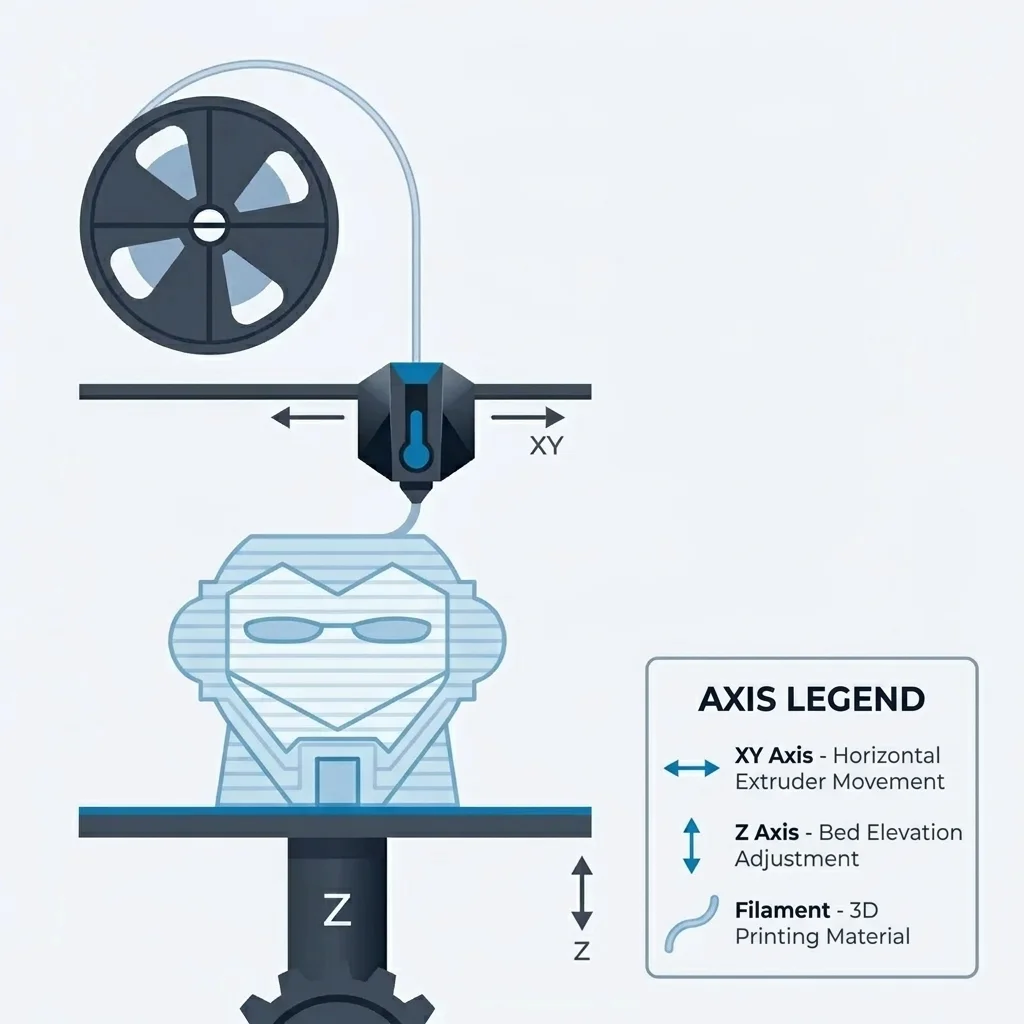
This diagram illustrates the FDM 3D printing process, where filament is fed through a heated nozzle to build objects layer by layer on a platform.
Pros:
- Affordable and easy to use.
- Wide material choices (including flexible TPU and strong PETG).
- Minimal maintenance once calibrated.
Cons:
- Visible layer lines unless sanded or vapor-smoothed.
- Overhangs require supports.
- Warping can occur if cooling or bed adhesion is off.
Best for:
Beginners, tinkerers, and practical prints - like phone holders, replacement parts, or cosplay armor.
Pro tip:
PLA (Polylactic Acid) is perfect for starting out - it's cheap, eco-friendly, and forgiving. But don't leave PLA prints in hot cars; it softens at around 60 °C.
 Credit (c) YouTube: Tinkerine
Using a heat gun to prevent warping in PLA prints, ideal for beginners tackling common adhesion issues.
2Resin Printing (SLA / MSLA)
If FDM printers are the hammers, resin printers are the scalpels.
How it works:
A vat of liquid photopolymer resin is cured layer by layer using light - either a laser (SLA) or an LCD mask (MSLA). The build platform lifts as each layer solidifies.
Pros:
- Exceptional detail - perfect for miniatures, jewelry, or dental molds.
- Smooth, glossy surfaces.
- Excellent for complex geometries.
Cons:
- Messy and requires gloves/masks (resin is toxic before curing).
- Prints need alcohol rinsing and UV curing afterward.
- The smell isn't pleasant.
Best for:
Artists, tabletop gamers, or engineers needing fine-detail prototypes.
Pro tip:
Store your resin away from sunlight - even ambient UV will partially cure it and ruin print quality.
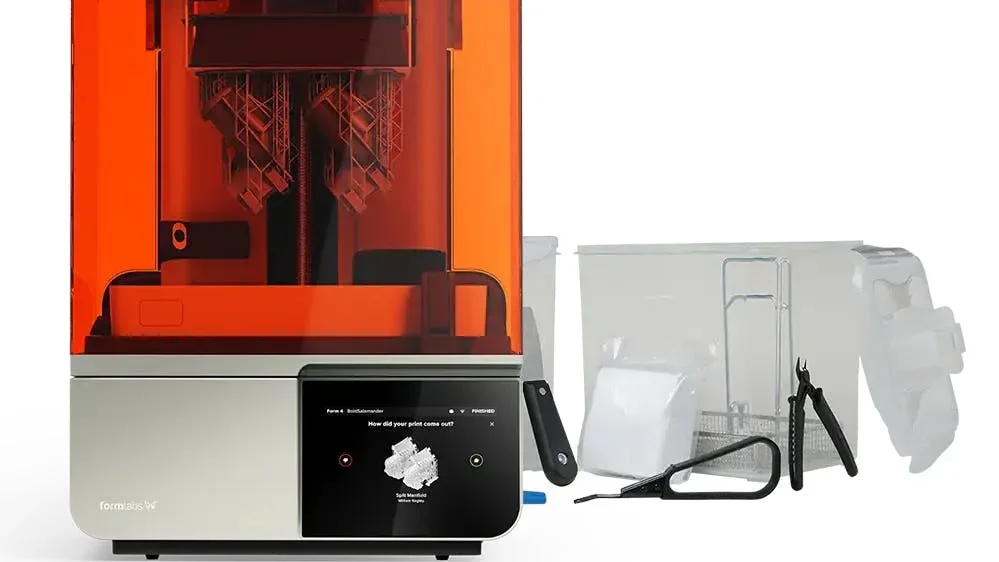
Resin 3D printers, ideal for detailed prototypes, require careful storage away from UV light to maintain print quality.
3Powder-Based Printing (SLS / MJF / Powder Bed Fusion)
The industrial powerhouse.
How it works:
Fine powder (nylon, metal, or composite) is spread in thin layers and selectively fused using lasers or heat. This family of methods is known as Powder Bed Fusion.
Pros:
- No supports needed - the surrounding powder holds the part.
- Strong, isotropic parts (equal strength in all directions).
- Ideal for functional prototypes or end-use parts.
Cons:
- Expensive hardware (often $10,000+).
- Requires post-processing to remove unused powder.
- Not beginner-friendly.
Best for:
Professional labs, automotive, aerospace, or medical industries.
Pro tip:
If you ever handle an SLS print, notice the slightly rough, powdery surface - it's a hallmark of nylon fusion.
The table below breaks them all down - not just the hobbyist favorites like FDM and resin, but the professional and experimental methods driving the next generation of manufacturing.
| Technology | Full Name / Family | Core Process | Common Materials | Print Quality & Detail | Strength & Durability | Speed | Advantages | Limitations / Challenges | Ideal Applications | Approximate Cost Range |
|---|---|---|---|---|---|---|---|---|---|---|
| FDM / FFF | Fused Deposition Modeling / Fused Filament Fabrication | A heated nozzle extrudes molten thermoplastic filament layer by layer. | PLA, PETG, ABS, TPU, Nylon, ASA | Moderate; visible layer lines (0.1-0.3 mm typical layer height). | Good; strength depends on layer adhesion and infill. | Moderate; faster with larger nozzles. | Affordable, easy to use, wide material availability, minimal setup. | Warping, visible layers, weaker Z-axis bonding, requires supports. | Prototypes, mechanical parts, DIY tools, enclosures, toys, cosplay. | Entry: $200-$800 | Pro: $1,000-$3,000 |
| SLA | Stereolithography | A laser cures liquid photopolymer resin point-by-point in a vat. | Standard resin, tough resin, flexible, dental, castable. | Extremely high; smooth surfaces and fine detail. | Moderate; brittle unless using specialty resin. | Slower for large parts. | Excellent precision, smooth finish, ideal for small detailed parts. | Toxic uncured resin, cleanup required, smaller build volume. | Dental molds, jewelry, miniatures, design prototypes. | $400-$4,000+ |
| MSLA / LCD | Masked Stereolithography | LCD screen cures entire resin layer simultaneously using UV light. | Same as SLA resins. | Very high; equal or slightly better than SLA in speed and consistency. | Similar to SLA. | Fast (entire layer at once). | Affordable resin printing, sharp details, fast layer exposure. | Resin handling and post-curing required, screen wear over time. | Figurines, prototypes, dental and jewelry parts. | $250-$2,000 |
| DLP | Digital Light Processing | A projector flashes an entire layer image to cure resin at once. | Photopolymer resins. | Very high; crisp detail and smooth surface. | Similar to SLA; dependent on resin formulation. | Fast (entire layer per projection). | High resolution, good for production batches. | Limited build size, resin maintenance, projector bulb aging. | Miniatures, precision models, dental work. | $2,000-$10,000 |
| SLS | Selective Laser Sintering | A laser fuses powdered polymer layer by layer without support. | Nylon (PA11, PA12), TPU, composites. | High; slightly rough surface texture. | Excellent; strong and isotropic. | Moderate. | No supports needed, durable parts, complex geometry possible. | Expensive, powder handling messy, post-processing required. | Functional prototypes, enclosures, engineering components. | $6,000-$100,000+ |
| MJF | Multi Jet Fusion | Thermal agents and infrared light fuse polymer powder selectively. | Nylon, TPU, PA12, PA11. | High; smooth and consistent surface. | Excellent; strong and durable, better isotropy than FDM. | Faster than SLS. | Fast, consistent, production-ready quality. | High cost, limited materials. | Production parts, functional prototypes. | $30,000-$250,000 |
| DMLS / SLM | Direct Metal Laser Sintering / Selective Laser Melting | A laser melts fine metal powder to form solid metal parts layer by layer. | Aluminum, titanium, stainless steel, cobalt-chrome, Inconel. | Very high; near-dense metal parts. | Exceptional; true metal properties. | Slow; metal cooling cycles required. | Produces functional metal parts, replaces CNC for complex shapes. | Extremely expensive, requires inert gas & post-processing. | Aerospace, automotive, medical implants, tooling. | $100,000-$1M+ |
| Binder Jetting | - | A liquid binder selectively joins powder particles layer by layer; later sintered. | Sand, metal, ceramics, composites. | Moderate; good for bulk prints. | Depends on post-processing (sintering). | Fast for large parts. | High speed, scalable, wide materials. | Weaker "green" parts before sintering, lower precision. | Metal casting molds, large prototypes, decorative parts. | $50,000-$500,000 |
| PolyJet / Material Jetting | - | Inkjet-style heads deposit droplets of photopolymer, cured by UV light. | Photopolymer resins (multi-color possible). | Extremely high; smooth, color-capable, multi-material. | Moderate; not as strong as FDM/SLS. | Moderate. | Full-color prints, soft-touch or mixed-material parts. | Expensive consumables, fragile prints. | Concept models, medical visualization, design prototypes. | $25,000-$250,000 |
| DED | Directed Energy Deposition | Metal wire or powder is melted by laser or electron beam as it's deposited. | Metals (titanium, stainless steel, Inconel). | High; depends on deposition precision. | Exceptional; metallurgical-grade parts. | Slow; used for repairs or large builds. | Can repair or add material to existing parts. | Complex calibration, expensive equipment. | Aerospace repair, industrial tools, metal structures. | $250,000-$2M+ |
| LFS | Low Force Stereolithography (by Formlabs) | Advanced resin process using flexible film and controlled light for smooth layers. | Proprietary resins (tough, elastic, dental, high-temp). | Extremely high; minimal layer lines. | Moderate to strong. | Moderate. | User-friendly, smooth finish, automated supports. | Limited to proprietary ecosystem. | Professional design, dental, engineering prototypes. | $3,000-$10,000 |
From Idea to Object: The 3D Printing Workflow
Let's walk through a real example.
You need a custom mount for your GoPro.
1Step 1: Modeling
You can design it yourself in Tinkercad or Fusion 360, or download one from Thingiverse or Printables. The file will usually be in STL format - a universal geometry file for 3D printers.
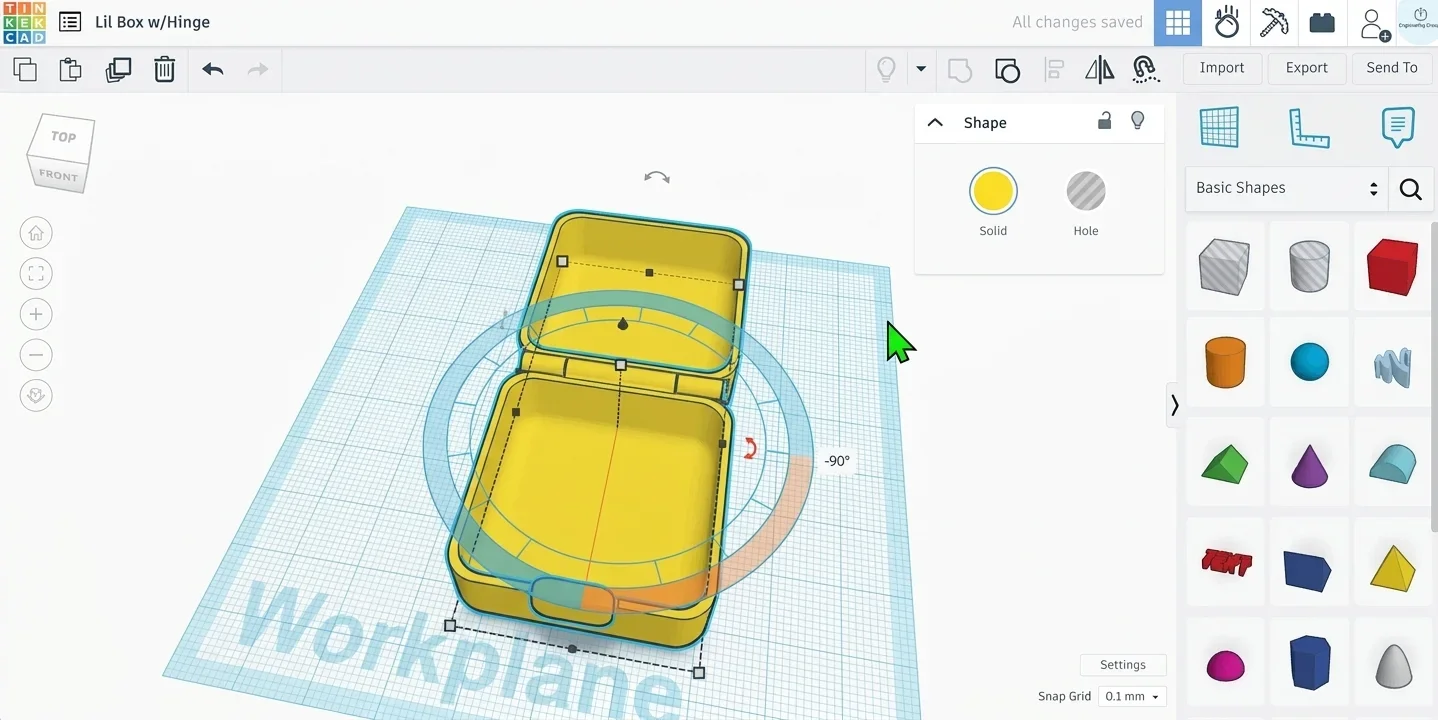
This image shows a 3D model of a custom GoPro mount created using Tinkercad, illustrating the initial design step before printing.
2Step 2: Slicing
Load the STL into your slicer. This is where you set:
- Layer height (detail level)
- Infill density (how solid it is)
- Supports (temporary scaffolds for overhangs)
- Temperature and speed
A thinner layer height (like 0.1 mm) gives smoother results but takes longer. Think of it like printing a photo in high vs. draft quality.
3Step 3: Printing
Send the sliced G-code to your printer via SD card or Wi-Fi.
Check the first layer like a hawk - if it doesn't stick, stop and re-level the bed. Many failures begin there.
4Step 4: Post-Processing
Once printed:
- Remove supports carefully.
- Sand or file rough edges.
- Optionally, paint, polish, or assemble.
In resin printing, post-processing includes washing in isopropyl alcohol and curing under UV light to reach full strength.
5Step 5: Testing and Iteration
Your first print probably won't be perfect - that's normal. Adjust tolerances, tweak your slicer settings, and try again.
In 3D printing, failure is feedback.
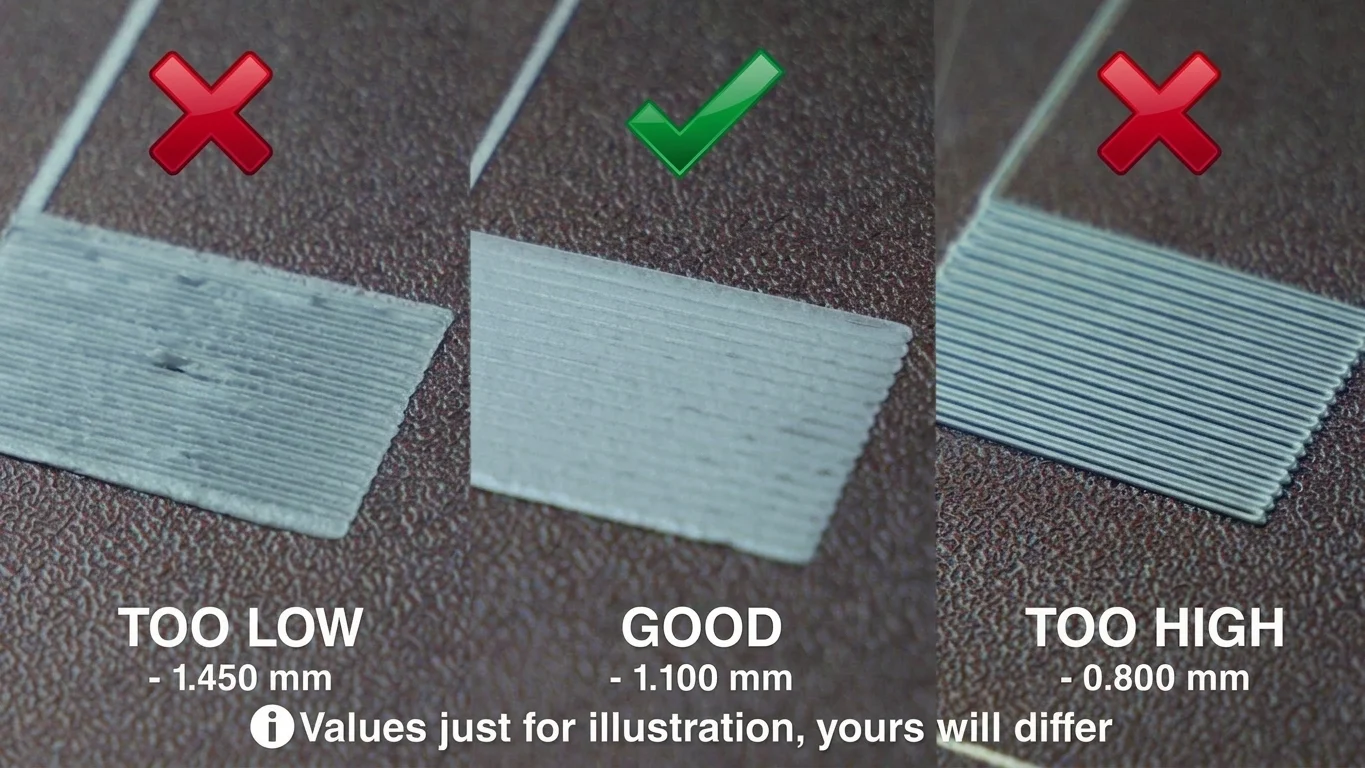
This image illustrates common layer height issues in resin 3D printing, highlighting the importance of testing and iteration for optimal results.
The Building Blocks: Materials Matter
Choosing the right material in 3D printing isn't just about color or cost - it's about matching performance with purpose.
A phone stand printed in brittle PLA might survive your desk but fail in a hot car. A nylon gear will outperform it, but needs an entirely different setup. Every filament, resin, or powder has a personality - strengths, weaknesses, and small behavioral quirks you only learn after a few prints.
Below is a detailed table comparing the most commonly used 3D printing materials, organized by printing technology and practical use case.
| Material | Technology | Type / Category | Key Strengths | Weaknesses | Typical Applications | Printability | Durability | Surface Finish | Special Notes & Pro Tips |
|---|---|---|---|---|---|---|---|---|---|
| PLA (Polylactic Acid) | FDM | Thermoplastic (biopolymer) | Easy to print, low warp, biodegradable, detailed surface finish. | Brittle, low heat resistance (softens ~60 °C). | Prototypes, decorations, toys, low-stress parts. | ⭐⭐⭐⭐⭐ (Very easy) | ⭐⭐ | Smooth, matte/glossy depending on brand. | Ideal for beginners. Store dry - moisture degrades print quality. |
| PETG (Polyethylene Terephthalate Glycol) | FDM | Thermoplastic | Tough, flexible, water- and UV-resistant. | Stringing if settings off, adhesion can be tricky. | Outdoor parts, mechanical items, containers. | ⭐⭐⭐⭐ | ⭐⭐⭐⭐ | Glossy, translucent if thin. | Increase retraction and slow print for cleaner finish. |
| ABS (Acrylonitrile Butadiene Styrene) | FDM | Thermoplastic | Heat resistant, strong, lightweight. | Prone to warping, requires heated enclosure, emits fumes. | Automotive parts, enclosures, functional prototypes. | ⭐⭐ | ⭐⭐⭐⭐ | Matte; smooth after acetone vapor smoothing. | Use enclosed printers or high ambient temperature. |
| ASA (Acrylonitrile Styrene Acrylate) | FDM | Thermoplastic | UV and weather resistant, strong, color-stable. | Slight warping, higher temp needed. | Outdoor enclosures, automotive components. | ⭐⭐⭐ | ⭐⭐⭐⭐ | Matte, durable. | Great ABS alternative for outdoor use. |
| TPU / TPE (Thermoplastic Polyurethane / Elastomer) | FDM | Flexible polymer | Elastic, shock-absorbing, wear-resistant. | Hard to print fast, stringing issues. | Phone cases, gaskets, belts, wearables. | ⭐⭐ | ⭐⭐⭐ | Soft-touch, rubbery. | Reduce speed (<30 mm/s) and ensure direct-drive extruder. |
| Nylon (PA6, PA12) | FDM / SLS | Engineering thermoplastic | Extremely durable, flexible, abrasion-resistant. | Moisture-sensitive, warps easily (in FDM). | Gears, mechanical components, functional prototypes. | ⭐⭐ | ⭐⭐⭐⭐⭐ | Slightly rough; matte. | Dry before printing; store with silica gel. |
| Polycarbonate (PC) | FDM | Engineering thermoplastic | High strength, heat and impact resistant. | Requires high temp (260 °C+), enclosure needed. | Engineering parts, protective housings. | ⭐⭐ | ⭐⭐⭐⭐⭐ | Glossy, transparent options. | Use adhesive bed (PEI/glue) to prevent warping. |
| HIPS (High Impact Polystyrene) | FDM | Support / secondary filament | Dissolves in limonene, good support material for ABS. | Weak structural integrity. | Dissolvable supports, temporary structures. | ⭐⭐⭐⭐ | ⭐ | Smooth. | Great when used with dual extrusion setups. |
| PVA (Polyvinyl Alcohol) | FDM | Support material (water-soluble) | Dissolves in water, perfect for complex supports. | Absorbs moisture easily, costly. | Dual extrusion supports for PLA, PETG. | ⭐⭐⭐ | ⭐ | Slightly rough. | Store airtight - dissolves in humidity. |
| CF-PLA / CF-Nylon (Carbon Fiber-Reinforced) | FDM | Composite | Stiff, strong, minimal warp. | Brittle, abrasive to nozzle. | Drone frames, structural parts. | ⭐⭐⭐ | ⭐⭐⭐⭐ | Matte, textured. | Use hardened steel nozzle to avoid wear. |
| Resin (Standard) | SLA / MSLA / DLP | Photopolymer resin | High detail, smooth surface, good accuracy. | Brittle, toxic uncured. | Figurines, miniatures, detailed prototypes. | ⭐⭐⭐⭐ | ⭐⭐ | Glossy, glass-like. | Wash with 99 % IPA; cure with UV for full strength. |
| Tough Resin | SLA / MSLA | Engineering resin | Stronger, impact-resistant. | Slightly less detailed. | Functional parts, prototypes, small mechanical components. | ⭐⭐⭐ | ⭐⭐⭐⭐ | Smooth, opaque. | Cures slower than standard resin - extend UV exposure. |
| Flexible Resin (Elastic / TPU-like) | SLA / MSLA | Elastic resin | Stretchy, soft, bendable. | Tricky to remove supports, slower printing. | Wearables, gaskets, prosthetics. | ⭐⭐ | ⭐⭐ | Smooth and rubber-like. | Handle gently during post-curing - can tear easily. |
| High-Temp Resin | SLA / MSLA | Engineering resin | Resistant to heat and deformation. | Expensive, brittle under stress. | Molds, tooling, thermal testing. | ⭐⭐ | ⭐⭐⭐⭐ | Glossy. | Pre-heat before use for stable curing. |
| Castable Resin | SLA / MSLA | Specialty resin | Burns cleanly for lost-wax casting. | Brittle, high cost. | Jewelry, dental casting. | ⭐⭐ | ⭐ | Glossy. | Requires careful burnout process. |
| Nylon PA12 Powder | SLS / MJF | Polymer powder | Strong, isotropic, no supports needed. | Requires expensive printers. | Engineering parts, enclosures, hinges. | ⭐⭐⭐ | ⭐⭐⭐⭐⭐ | Slightly grainy matte. | Ideal for production runs - consistent strength. |
| TPU Powder (Elastomer) | SLS / MJF | Flexible polymer powder | Elastic, durable, good recovery. | Expensive, limited color options. | Footwear, seals, gaskets. | ⭐⭐⭐ | ⭐⭐⭐⭐ | Matte, flexible feel. | Requires careful temperature control for elasticity. |
| Metal Powders (Al, Ti, SS, Inconel) | DMLS / SLM | Metallic | Exceptional strength, heat & corrosion resistant. | Extremely expensive, complex handling. | Aerospace, medical implants, tools. | ⭐ | ⭐⭐⭐⭐⭐ | Matte to semi-gloss. | Requires inert atmosphere and post-machining. |
| Composite Powders (Carbon/Nylon, Glass-Filled) | SLS / MJF | Reinforced polymer | Rigid, lightweight, strong. | Costly, limited color range. | Automotive, robotics. | ⭐⭐ | ⭐⭐⭐⭐ | Rough matte. | Improves stiffness; dry powder well before printing. |
| Ceramic Powder / Slurry | Binder Jetting / DLP | Ceramic composite | High hardness, heat and chemical resistance. | Fragile pre-firing, long sintering time. | Art, dental, molds, high-temp parts. | ⭐⭐ | ⭐⭐⭐⭐ (after firing) | Smooth, porcelain-like. | Requires kiln firing to full strength. |
| Sand Powder (Silica / Gypsum) | Binder Jetting | Mineral powder | Large-scale, fast printing. | Fragile before infiltration. | Casting molds, architectural models. | ⭐⭐ | ⭐⭐ | Grainy, natural texture. | Often post-hardened with epoxy. |
| Concrete / Mortar Mixes | Construction 3D Printing | Cement-based | High compressive strength, scalable. | Slow curing, layer bonding challenges. | Houses, walls, architectural structures. | ⭐⭐ | ⭐⭐⭐⭐⭐ | Rough; structural finish. | Control humidity and curing to avoid cracking. |
| Photopolymer Mix (PolyJet) | PolyJet | Multi-material photopolymer | Full-color, transparent or rubber-like finish. | Expensive, fragile. | Concept models, design visualization. | ⭐⭐⭐ | ⭐⭐ | Ultra-smooth, multi-color. | Great for aesthetic and tactile prototypes. |
Experimenting with these will teach you more than any spec sheet. Every filament brand behaves slightly differently, and even humidity can change results. Seasoned makers often store spools in airtight bins with silica gel.
What You Actually Need to Start
Many newcomers think they must spend thousands. Not true. A basic setup under $400 can teach you everything.
Starter checklist:
- Printer: Creality Ender 3 V3 SE or Anycubic Kobra 2 (for FDM).
- Filament: PLA, preferably from a reputable brand like eSun or Hatchbox.
- Tools: Spatula, calipers, tweezers, and a glue stick (for adhesion).
- Software: Cura or PrusaSlicer (both free).
- Environment: A well-ventilated area, away from drafts.
 Credit (c) Pick3DP
This flowchart illustrates the 3D printing process, highlighting essential steps from STL file preparation to printing. Understanding this workflow is crucial for beginners using tools like Cura or PrusaSlicer in a suitable environment.
Optional but recommended:
- A magnetic build plate for easy removal.
- A filament dryer if you live in a humid region.
- A resin wash-and-cure station if printing with resin.
You don't need to know CAD design from day one. Downloading community models and modifying them is how most start. Before long, you'll crave customization - and that's when 3D design becomes addictive.
Slicers: The Unsung Heroes
The slicer is the interpreter between your imagination and your printer.
A slicer like Cura, Bambu Studio, or Lychee takes your STL model and translates it into toolpaths - the actual movements and material commands. It's where you control speed, temperature, layer thickness, infill, and supports.
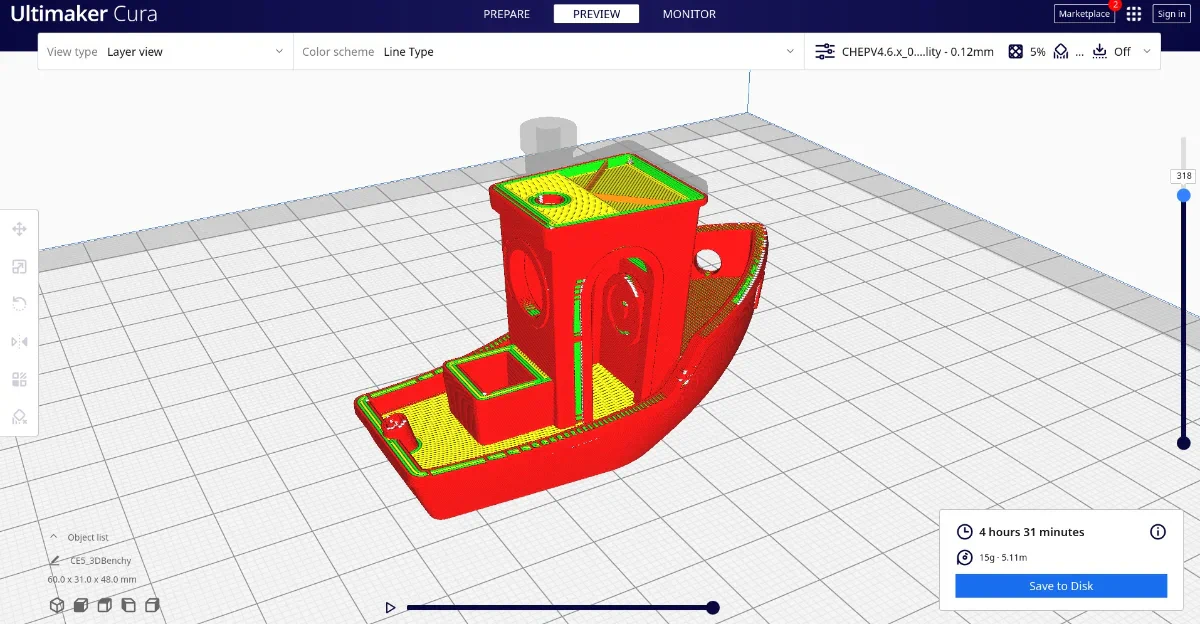
Cura slicer software translating a 3D model into toolpaths, showcasing control over printing parameters like speed and infill.
Key Slicer Concepts:
- Layer Height: Smaller = smoother surface, longer print time.
- Infill: The internal pattern. 20 % grid is typical for strong yet light parts.
- Supports: Temporary structures for overhangs above 45 °.
- Shells (Perimeters): The number of outer walls. More shells = stronger part.
- Retraction: Pulls back filament to avoid stringing.
- Brims/Rafts: Help improve bed adhesion.
Learning to tune slicer settings is like learning photography exposure - once you understand the interplay, you gain creative control.
The Reality of Post-Processing
Many beginners think printing ends when the nozzle stops. In truth, that's only halftime.
Post-processing transforms a print from "functional" to "fantastic."
1For FDM prints:
- Support Removal: Use pliers or flush cutters.
- Sanding: Start with 200 grit and progress to 800+ for smoothness.
- Priming & Painting: Acrylics or spray paints adhere well to PLA.
- Vapor Smoothing (for ABS): Acetone vapor gently melts the surface for a glossy finish (ventilate properly).
Sanding is a crucial step in finishing 3D printed objects, using 220-grit sandpaper to achieve a smoother surface before priming and painting.
2For Resin prints:
- Washing: Rinse uncured resin with 99 % IPA.
- Curing: Use UV light (a cheap nail lamp works).
- Sanding & Painting: Same as FDM once fully cured
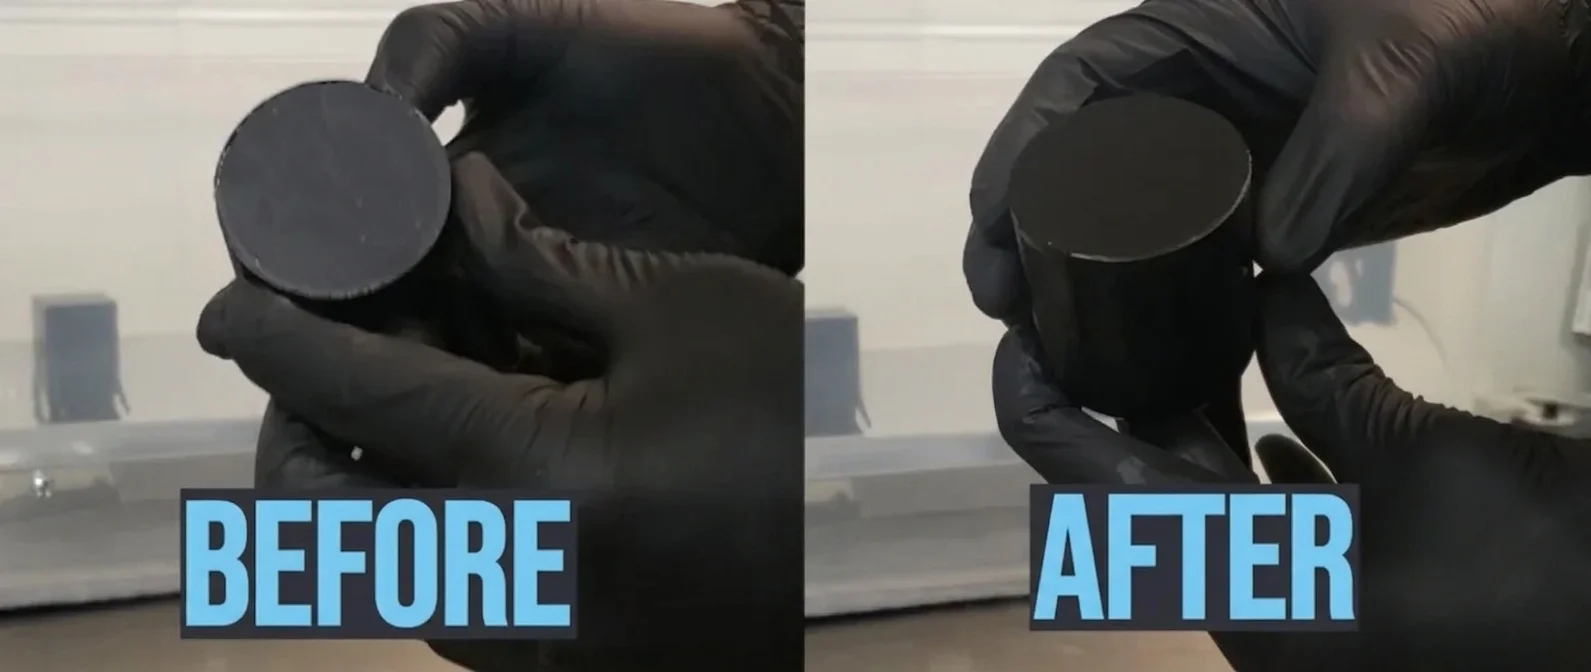
This image illustrates the transformation of a 3D printed object before and after resin curing and finishing techniques. Note the enhanced surface quality post-treatment, essential for achieving professional results.
This stage is also where creativity explodes - you can weather, polish, or combine prints into larger assemblies. The line between hobbyist and artisan blurs here.
Common Pitfalls and How to Avoid Them
Every maker has cursed a spaghetti-shaped disaster at least once. Here's what goes wrong - and why.
1Bed Adhesion Fails
If your first layer doesn't stick, the entire print collapses.
Fix: Clean your bed with isopropyl alcohol, level it manually, and set the nozzle slightly closer. Add a brim if needed.
2Warping and Curling
Common with ABS or large prints. Corners lift off due to uneven cooling.
Fix: Use an enclosure, consistent bed temperature (60-70 °C), and adhesive aids like glue or hairspray.
3Under-Extrusion
Gaps or weak layers mean the nozzle isn't pushing enough material.
Fix: Check filament tension, nozzle clog, or extrusion multiplier.
4Stringing
Fine wisps between parts indicate retraction issues.
Fix: Increase retraction distance or speed in your slicer. Lower nozzle temperature slightly.
5Layer Shifts
Mechanical bumps or loose belts cause the print to misalign mid-way.
Fix: Tighten belts, ensure rails are lubricated, and avoid bumping the printer mid-print.
Each failed print is a teacher. Keep them - they'll remind you how far you've come.
 Credit (c) simplify3d.com
This 3D printed chair model shows common beginner issues like stringing and misalignment. Troubleshoot by adjusting retraction settings and ensuring mechanical stability.
Advanced Insights for the Curious
Once you've mastered basics, optimization becomes addictive.
1Speed vs. Quality
Printing fast is tempting but often reduces detail and adhesion. High-end printers like Bambu Lab P1S can hit 500 mm/s, yet even they rely on smart vibration compensation. For most setups, 60-80 mm/s balances reliability and finish.
 Credit (c) YouTube: Pushing Plastic
A 3D printed speed tower demonstrates the impact of varying print speeds from 20 to 100 mm/s, highlighting the balance between speed and quality in 3D printing.
2Infill Patterns
Infill isn't just decoration - it dictates strength.
- Gyroid: Flexible yet strong - good for functional parts.
- Cubic: Balanced and efficient.
- Honeycomb: Classic look, slightly slower to print.
Experiment - you'll be amazed how the same model feels different with just this change.
 Credit (c) Reddit : XFabricate
Explore how different 3D printing infill patterns like cubic and honeycomb affect print efficiency and texture. Each pattern can dramatically change the feel of a model, offering unique benefits and challenges.
3Support Interface Layers
A trick pros use: add a "support interface" - thin layers between the support and your model. They peel away cleanly, saving hours of sanding.
4Dual-Material Printing
Advanced printers can combine materials - one for structure, one for dissolvable supports (PVA). Great for intricate overhangs and smoother results.
The Psychology of Making
3D printing isn't just about engineering - it's emotional. Watching something emerge from nothing scratches a deep creative itch. It gives tangible proof that your ideas matter.
It also teaches humility. Every misprint is a lesson in patience, precision, and iteration. You learn to diagnose problems, experiment, and celebrate small wins - skills that translate far beyond the workshop.
That's why many educators now introduce 3D printing in classrooms: it merges art, science, and problem-solving in one hands-on experience.
 Credit (c) techexplorist.com
A 3D printer in action brings ideas to life, illustrating the blend of creativity and precision in modern classrooms.
The Broader Impact: From Hobby to Industry
What began as a tinkerer's toy now drives billion-dollar industries.
- Aerospace: GE Aviation prints fuel nozzles that reduce weight by 25 %.
- Healthcare: Custom prosthetics and dental aligners tailored to each patient.
- Architecture: Entire houses printed with concrete extruders.
- Fashion: Designers experiment with 3D-printed textiles and shoes.
- Sustainability: Localized manufacturing reduces shipping and waste.
The same technology that helps you print a phone holder is reshaping supply chains.
And that's the beauty - accessibility fuels innovation. Every time someone downloads a model, tweaks it, and re-uploads it better, the ecosystem evolves.

This 3D printed prosthetic arm exemplifies how localized manufacturing can reduce waste and transform traditional supply chains, enhancing accessibility and innovation.
What It Really Feels Like to Start
The first print rarely goes perfectly. Maybe the nozzle clogs, or the bed isn't level, or the filament snaps halfway through. You'll stare at a half-formed mess and wonder if you broke something.
You didn't.
You're just crossing the same learning curve everyone does. Every successful print feels earned - because it is.
Over time, you'll develop instincts. You'll recognize by sound when a print's going wrong. You'll feel a strange sense of companionship with your printer - like a moody pet that rewards care with magic.
And the day your first complex print finishes cleanly - supports pop off, layers align flawlessly - you'll grin like a kid again.
Tips for Success
- Calibrate regularly. A level bed is sacred.
- Keep spare nozzles. They clog eventually - consider them consumables.
- Print test cubes. Small calibration prints save you hours later.
- Join communities. Reddit's r/3Dprinting, Facebook groups, and Discord servers are goldmines of collective wisdom.
- Document your settings. The same setup can fail months later if you forget what worked.
- Tinker fearlessly. The best prints come from curiosity, not manuals.
The Ultimate Guide to Perfect 3D Prints - Source (Youtube@Maker's Muse)
Takeaways & Next Steps
3D printing isn't about machines - it's about mindset.

It teaches that complexity is manageable when you break it into layers. That progress often looks like trial and error. That patience, iteration, and curiosity can turn pixels into products.
If you're ready to start:
- Download a simple phone stand from Thingiverse.
- Slice it with default settings in Cura.
- Print, fail, adjust, repeat.
Within a few weekends, you'll understand more about design, engineering, and creativity than months of theory could ever teach.
So, what is 3D printing?
It's not just the process of melting plastic or curing resin.
It's the moment you realize that ideas aren't limited by what's on the shelf - they're limited only by what you can imagine and make, layer by layer.
Technical communicator specialising in 3D printing workflows, covering the full content spectrum: foundational guides, step-by-step how-to tutorials, hands-on reviews, curated top picks, troubleshooting solutions, and industry news.
Free Downloads
Loading...

The Ultimate Guide to 3D Printing
5 essential cheat sheets to help you 3D print smarter — settings, materials, troubleshooting, and post-processing in one free bonus.